. Video_Contest_980x148_v01 .

Archive for October, 2011

Home Run Inn Pizza’s super creepy Halloween video contest winner

Boo!

Well, tomorrow is Halloween so it’s only fitting that today I post the creepiest, most disturbing video to ever win a video contest.  I must warn you that once you see this video, you can never un-see it!  So prepare yourselves for the horror that is the grand prize winner of Home Run Inn Pizza’s Halloween Video Challenge!

Grand Prize Winner.  Prize: $2,500 and a Halloween Party Pack:


Yo, that is some seriously freaky s#$%! If you think I’m being sarcastic, I’m not. There is just something about that video that makes my skin crawl. I’m sure the person who made that video didn’t intend for it to be so disturbing but that’s how it turned out. That flat, emotionless, robotic narration coupled with that simple and repetitive animation is just kind of haunting. And those monsters are just creepy as hell. What is up with the brown Frankenstein!? And does Dracula have such a big, fat head?? And why the hell are all those monsters walking in place like that!?

As you can probably guess, Home Runn Inn picked the winners of this contest through a public vote. And when a company holds a public vote, that is the kind of winner you get. In fact, who wins is basically irrelevant. The whole contest is just an excuse to get people to “like” the sponsor’s page on facebook. Some day I hope a company has the nerve to skip the part where people have to create an entry and just run a straight-up voting contest. If your name gets the most votes, you win!

I actually entered the Home Run Inn contest this year and no joke, I am glad this video won. I was just hoping to land in the Top 15 so I could win a year’s supply of free pizza and a special Flip camera. (I did!) So I got what I wanted and as a bonus, HRI Pizza wound up with a winning video that is totally insane. As weird as it is, you do have to respect the amount of work that went in to that entry. It might not be super slick but it’s better than any kind of animation that I could do. Of course, I think it’s possible that all those monsters were stock characters. And they were probably already programed to “walk” and that’s why they walk in every shot, even when they’re not moving forward.

This contest got a whopping 68 entries and if you’d like to see them all, head here. Happy Halloween Everybody!

How to get unlimited, real youtube views

Youtube: Where all your viral dreams come true

Every once and a while I will come across a “viral” video contest where the winner is determined by youtube views.  And when I do see a contest like that it takes a lot of will power for me NOT to enter.  You see, in my time running this website I have learned a lot of shady tricks; and “how to get to get tons of fake youtube views” is one of those tricks.  Basically if you go to the right website you can order all the views you want.  But those “views” are just fake, junk views.  They’re just generated by some guy in India using a computer that is constantly changing its IP address. (or something like that)  They don’t come from real people.  So in most “viral” contests, buying fake views would be considered cheating.  If you buy fake views, there is a chance you could get caught because fake views leave evidence behind.  And not only could you get disqualified from the contest you’re in, you could be kicked off of youtube for violating the site’s Terms of Service.

So like I said, I try not to enter “viral” video contests.  But about two months ago I came across a contest that was being run by a new micro-jobs website that I just had to enter.  The competition was being run in two stages.  In the first stage, people were supposed to create funny videos about giraffes (The website’s mascot is a giraffe) and then try to get as many youtube views as they could in four weeks.  The people who created the Top 5, most viewed submissions got to go on to round two where they would compete for $15,000.  I decided to enter but I promised myself I would NOT buy fake youtube views.  ()  I figured that with the resources I have at my disposal I could get into the Top 5, fair and square.  This website just keeps getting more and more traffic so I stuck a banner ad for my own video at the top of this page.  And man, did that get me a lot of views!  Plus, I have a kind of popular youtube channel with a few thousand subscribers.  So I was able to get a good chunk of views from there too.

But inevitably, as the view count deadline approached, the cheating began.  Several other contestants started buying fake views and I was pushed out of the Top 5.  I contacted the contest organizers and I explained how you could tell when someone’s view count was phony.  But they said they really couldn’t do anything about it because the practice wasn’t actually against the rules.  (So technically, it wasn’t even cheating!)  So basically I recived the OK from the contest organizers to do whatever I could to get in the Top 5.  But I still didn’t want to take the easy way out.  So I started looking for a legitimate solution to my problem.

And I found that solution in like five minutes.  It turns out that any youtube user can now sign up for the site’s “” program.  Basically you can now buy views from youtube!  Except unlike the other views you can buy, these are REAL views that come from REAL people.  If you use youtube’s promotions program to get 10,000 views, it means that 10,000 different people actually watched your video.  So while some might consider this bending the rules of a viral video contest, no one could claim that you’re breaking the rules since your views are coming from real people and since you’re not violating youtube’s terms of service.

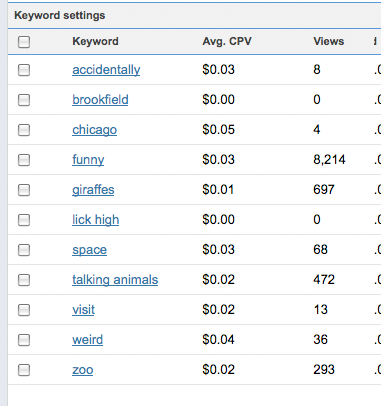
Here’s how the program works:  After you sign up you pick which video you want to promote.  Then you tell youtube how much you are willing to pay per view.  I think I went with 12 cents but you can go even lower.  And remember, that is the most you are willing to pay per view.  You then get to select the keywords you want associated with your video.  So if your video has a giraffe in it (like mine did) you can select “giraffe” as a keyword.  Then when someone searches for giraffe videos on youtube, your video will appear in the “Promoted Videos” sidebar.  The more specialized a keyword is, the more you will pay per-click.  Here’s a a screengrab of my Promoted Videos Dashboard that shows the keywords I used for my giraffe video:

Note: I cut out the irrelevant parts of this chart in photoshop

So even though I “bid” 12 cents per view, most of my views only cost me 2 or 3 cents.  And as you can see, the keyword “funny” was the most popular keyword by a long shot.

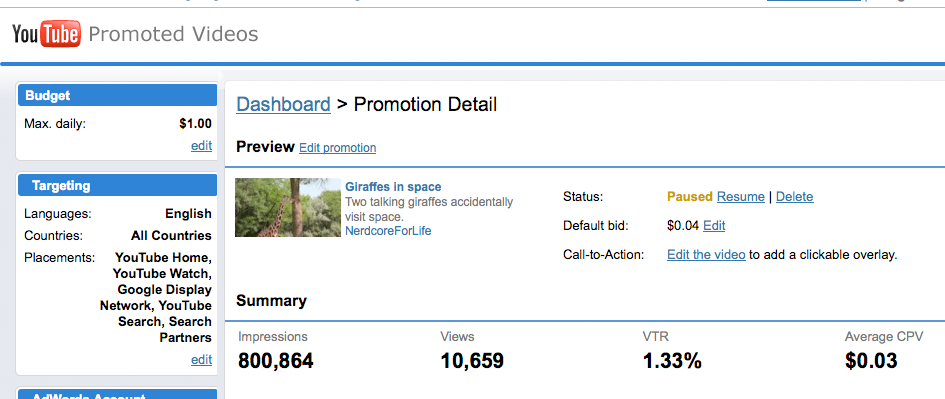
After you set your keywords, you tell youtube how much you want to spend every day promoting your videos.  If you say “$5.00″ youtube will run your video as an ad all day until you have spent $5.00.  I think the best thing about this program is how fast the process is.  If you want a huge number of views right away, you can tell youtube you want to spend $200 a day.  Youtube will pimp your video like crazy and by end of the day, you’ll have thousands of real views.  Here’s what your “dashboard” will look like once your “campaign” is up and running:

Again, this was photo-shopped to save space

The final view count for my giraffe entry was about 16,000.  And that was enough to get me into the finals.  As you can see, I recived 10,659 views thanks to youtube’s promoted video program.  And that means I was able to get 6,000 views on my own.  And that’s pretty damn good!  If the other contestants hadn’t bought fake views, I would have been able to get in the Top 5 without any help from youtube.

So youtube’s Promoted Videos program is pretty much just a giant, view-creating machine.  However many views you want, you can get.  And you only get charged when someone actually clicks on your video.  But there is one major drawback to this program; this s&%# ain’t cheap.  I spent about $300 to get those 10,000 views.  So was it a wise purchase?  Well, the results of the contest I was will be officially announced on November 1st so check back here on Monday to see how I did.

UPDATE: The sponsored decided to split the prize 3-ways so I won $5,000. That means my investment paid off big time. But one of the other winners just happened to be the biggest cheater in the view-count round. So it was awesome to win $5,000 but I’m annoyed that a cheater got a slice of the grand prize.
 

Putting together a cheap-o Halloween make-up kit

Back in grade school and high school I was one of those kids who’s “thing” was “making movies.”  My friends and I always had some kind of video project in the works but of course we did most of our filming in the summer.  And like most 14 year old screenwriters, we were mainly interested in stuff like monsters, zombies, aliens, serial killers and drunken clowns. (ok, maybe that last one was just me.)  We were shooting our mini-epics long before google or amazon so if we ran out of clown makeup or fake blood in July, we were pretty much screwed.  So every year I really looked forward to the week after Halloween since all the stores would sell their make-up, costumes and props for 50, 60 or even 90% off.  Come November first I would stock up on a year’s supply of stuff like this:

So realistic!

Unfortunately, the days of the “post-halloween” sale are pretty much gone.  In fact, I’ve noticed that some big stores start pulling their Halloween stuff off the shelves BEFORE October 31st!  The reason is that the Christmas season now officially begins on November 1st.  So the masks and costumes need to disappear fast to make room for all the fake trees.

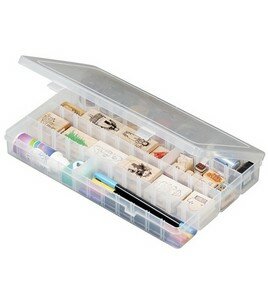
That sucks for several reasons but the good news is that a lot of stores now start reducing the prices on their Halloween merchandise before Halloween. I almost never use effects make-up in my video contest entries so I haven’t stocked up on cheap Halloween make up in many years.  But recently I was in JoAnn Fabrics buying some hot glue sticks or something when I saw a small plastic box with different sized slots in it.

Click the image to order one of these things

It was called an “Art Bin” but for some reason, when I saw it I immediately thought “this would be perfect for storing tubes of Halloween make up!”  It turns out that for the last 15 years or so, I had been subconsciously waiting for a solution to a problem I had when I was a kid.  You see, I always stored my Halloween makeup in a ziplock bag.  And I can still vividly remember how gross that bag got.  I’d open a thing of white makeup, use it and then toss it back in the bag.  So in no time the inside of the bag would be covered in cheap, greasy makeup.

So even though I have almost zero use for effects makeup, I had to buy that box and fill it with $1.00 tubes of fake blood, green and blue makeup and black nail polish.  When it comes to stuff like this, it’s better to have it and not need it rather than need it and not have it.  And actually, there are a lot of things you can do with the kind of cheap Halloween makeup you can buy at target or walmart.  For example, you could do what a lot of filmmakers have done and shoot your own Twilight or Zombie-themed contest entry!  And a little purple and brown makeup can make a pretty realistic bruise or black eye.  Oh you know what else is good to have on hand? A can of white hair spray.  It’s great for giving scientist or politician characters a little extra pizazz.  However you probably want to avoid featuring realistic blood, gore or injuries in MOST of your video contest entries.  I say “most” of your entries because every so often, I’ll see a video contest that kind of has a hardcore edge to it.  So if a contest is kind of edgy, you could push the envelope a bit and include a little violence just for the shock value.

If you actually try and put together a low-budget, effects makeup kit of your own, there are a few other items you should include.  If you see spirit gum and spirit gum remover in the Halloween isle, grab some.  That stuff can come in really handy.  And while your at it you might as well buy a few fake mustaches.  Why?  Because fake mustaches are freaking funny, that’s why.  To finish off your kit you’ll want to add some Q-tips, makeup sponges, and wet naps.  And or of course, you can’t forget the toothpicks!  Toothpicks are how the pros scratch themselves so that their makeup won’t smear.  But I bet you already knew that.

If you’re like me, once your $7 makeup kit is complete, you’ll look at it, feel proud for about five seconds and then you’ll shove the box into the back of your closet.  I doubt I’ll actually use any of the stuff in my kit but next summer if I find myself inspired to shoot a video contest entry about a mime or a vampire or a sports fan with a painted face, I’ll be good to go.

LED Panels: My new favorite lights!

Hello, beautiful.

For years I have been lighting my video contest entries with a pair of giant, 1,000 watt halogen lights with enormous “soft boxes” attached to them.  But frankly, those lights suck.  The bulbs get so hot that the lights have fans inside of them!  The fans are so loud that I’m always worried the mic will pick up the whirring sound they make.  And anyone who has ever put together a soft box can tell you, they’re a pain to set up and move.  Worst of all though, 1,000 watt bulbs aren’t easy to find.  The ones I used cost about 16 bucks each and I used to break them all the time.  Since you can’t just pick these bulbs up at your local home depot, I had to order them special online.  But recently, the company that sold me my light kit stopped carrying the bulbs!  They sold me their last two and said they don’t even know where I could find more of them.

So I took that as a sign that it was time to get some decent lights.  I did some research and decided to spend a little cash and buy my first .  And let me tell you something…these things are pretty sweet.  In fact, I used my new LED light on one shoot and the very next day I ordered a second one.  Here’s why these things are so amazing:

1.  The panels put out the equivalent of 500 watts of light but only use 50 watts of energy.  So you’re probably not going to be tripping any breakers with these.

2.  The light is so simple you could set it up in seconds.

3.  The LED panel is so small you could stick it in a back pack.

4.  The light emits pure white.

5.  The LED bulbs stay cool to the touch.

6.  There are separate switches on the back for different sections of the panel.  So basically, it comes with a “dimmer.”

7.  They’re so small you can fit one in a back pack.

8.  The look pretty cool.

And yes, “looking cool” is an important feature.  When you’re working on a low-budget video project, I think a professional atmosphere is good for the moral of the cast and crew.  So I really like these lights.  But they do have a few problems:

1.  They’re not cheap.  These lights cost me $179 each.  You can order them , BTW.

2.  The light they emit is incredibly STARK.  They have zero warmth to them.  You’ll need to carefully white balance and color correct your footage so it doesn’t look like you shot it in a prison.

3.  The lights I ordered didn’t come with stands.  You’ll need to order them separately.  works fine.

4.  Even on the lowest setting, the lights give off strong shadows.  You’ll need to diffuse the light somehow.

To be honest, at first these lights were kind of frustrating  Sometimes they would work great and sometimes the looked like crap.  It took me a little trial and error but I think I’ve finally gotten the hang of them.  I’ll throw one more numbered list at you.  Here are some tips for getting better footage out of your LED panels.

1.  Buy two of them.  Trust me, they work better in pairs.

2.  Set them up far from the subject.  The farther away the lights are, the better.  If you put them to close it will look like you’re shooting a horror movie.

3.  Use to diffuse the light.  Wax paper or Parchment paper should help too.

4.  Crank the lights up as bright as they go and then bounce the light off a ceiling or wall.

5.  Use them with natural sunlight!

I’ve found that these LED panels work great when you have some natural sunlight in your scene.  If an open window is your main light source, you can use the light to fill in the shadows.  Seriously, it works like a charm since the sun and the LEDs are the same “color temperature.”  Here’s an example of what I’m talking about.  Below is my entry for Home Run Inn Pizza’s Halloween video contest.  People were supposed to create scary stories that involved HRI Pizza.  I lit this whole scene with 2 LED panels and the sun.  And I mean every shot in this video was lit with the LED lights; even the wide shot of the exterior of the house:

Click the image to watch...if you dare.

To a causal viewer, the lighting in this video would probably seem totally natural.  But trust me, without the LED panels it would have looked like garbage.  Take the shot of the ghost for example.  You can see that the sunlight is coming from behind him.  So without an LED light shining right on him, his front would have been totally dark.  But I didn’t need to bathe the guy in artificial light.  I only had the LED panel on at about 30%.  And check out the shot of the skeleton in the kitchen.  Most of the light in that scene was coming from the kitchen window.  But the LED was able to fill in the shadows that the sun created.

Ok, sure…I know that there are a lot of lights that could yield similar results.  I could have stuck a 300 Watt bulb in a paper “china ball” lantern and the effect would be about the same.  But the LED panels are a lot more precise and you can “sculpt” the light since the panels have barn doors on them.  Plus, a gigantic China Ball can’t fit in tight spaces like the LED panel can.  So if you have a few hundred bucks burning a hole in your pocket, I suggest ordering an LED panel and trying it out.  After you get the hang of it you’ll want to stick it in a bag and bring it to every shoot you do.

Oh by the way…did you see what I did there when I used my Home Run Inn pizza video as an example?  It was my crass attempt to get a few votes for my entry.  Voting in that contest runs until the 27th and to vote, all you have to do is log in to facebook and click the vote button.  So please do vote if you have 15 seconds to spare.  If I get in the top 15, I’ll win free pizza for a year!  Also, be sure to watch the video.  Views don’t matter, I just think it’s pretty funny.

How to hire actors for your video contest entries

Believe it or not, I actually spent a year studying filmmaking in a somewhat-prestigious MFA film program. It was a huge waste of time and money and I left after the first year.  But I did lean a few valuable life lessons while I was at that school.  There were only 13 of us first-year grad students and one afternoon, we all took a walk from the Film Building over to the Theater Building.  The purpose of the field trip was to meet undergraduate acting students.  It turned out that for the undergrads, working on a grad student’s film was quite an accomplishment.

The students we met basically threw themselves at us.  They performed scenes and did improvs and took any request we could come up with.  Some of my classmates seemed to really enjoy the power and started asking the students to do more and more ridiculous things.  After a while the whole exercise really started to feel inappropriate.  As we were leaving, a beautiful young student came up to me, clawed my chest and enthusiastically proclaimed “use us….please use us…make us your whores….we will do anything you want!”  She was being dramatic but I will never forget the look in her eyes.  She meant what she was saying.  Of course, she didn’t mean it literally.  It wasn’t a sexual offer; it was an emotional one.

It was that moment I realized how much power directors have over actors.  Aspiring actors are some of the most hardcore and dedicated people you’re ever going to meet.  And an unscrupulous or uncaring director could really take advantage of a actor’s enthusiasm.

So when you start looking for actors and actresses for your video contest entries, you have to act like a professional and treat these people with respect.  As the director, you have something that they want.  There are thousands of hopeful actors in your city compared to only a few dozen directors who happen to be casting at the moment.  That means that as a filmmaker, you have a lot of power.  As I learned on that trip to the Theater Building back in grad school, even good people can let a little power go to their heads.  So the very first thing you need to do when casting for a video project is to tell yourself you’re not going to take advantage of the people who want to work with you.

And the next thing you need to do is get your ass over to Craigslist.

Like most video contest filmmakers, I used to recruit my family and friends to appear in my contest entries.  But it’s uncool to constantly ask people you know to act for you.  So now I get almost all of my actors from Craigslist.  (The irony is that every once in a while, a friend will ask me “How come you never ask me to be in your videos any more? I want to act again!”)  Hiring actors on craigslist is like shooting fish in a barrel.  And that’s why I prefaced this post with that little story about treating aspiring actors with respect.  Just because it’s easy to find actors and actresses  on Craigslist it doesn’t mean you should treat them like they’re disposable people that are lucky to be working with someone as brilliant as you.

If you’ve never used Craigslist to find actors before, you’ll first have to make a free Craigslist account.  (It’s also free to post a call for actors).  Once you have an account, head to the Gigs section and click on “Talent.”  The rest of the process is pretty self-explanatory.

But how do you write a post that will get the attention of decent actors?  The answer is simple; money.  Offer money and you will hear from dozens and dozens of people.  And you don’t have to offer a lot of money.  $50 or even $100 lets people know that you’re serious and that you know what you’re doing.  Yeah sure, there are a lot of actors out there that are so desperate to get footage for their reel that that they are willing to work for “copy and credit.”  But personally, I don’t think it’s right to ask actors to work for free on a project that could potentially win you thousands of dollars.  Plus, money ensures that the actors you select (probably) won’t flake out on you an not show up.

So what exactly should your post say?  Well, honesty is the best policy.  If you expect the shoot to take 4 hours, say that it will at least 4 hours.  If you only want actors of a certain type, mention that too otherwise a lot of people you can’t use will be e-mailing you.  Keep the whole thing short and upbeat.  If you’re shooting a video contest entry, be sure to say that.  But if you’re shooting an ad for a contest being run by Poptent, Mofilm, Tongal or Zooppa you should say that you’re “Shooting a commercial on Spec.”  And you should also mention that if the sponsor likes the ad, they will purchase it and use it.  That angle always works well for me since all actors would love to be in a “real” ad for a major company.  However, I always refrain from mentioning the sponsor’s name in the post.  You don’t want anyone to get the impression that you’re actually affiliated with the sponsor.  So if I’m shooting a Dell video for a Poptent assignment, I’ll say I’m “shooting an online ad on spec for a well-known computer company.”

Once your ad is up you’re inbox will soon be flooded with replies.  And you’ll quickly be faced with another dilemma.  Should you respond to the people you are sure you do not want to cast?  Personally, I don’t respond.  I just archive their e-mail.  Responding to each person who writes to you would take forever and most actors will understand that.  Besides, who wants to get an e-mail saying “thanks but no thanks?”

After weeding out the actors you know you can’t use, you’ll be left with a handful of potential cast members.  At this point, some directors would schedule in-person auditions.  But not me.  Why?  Because $50 or $100 is not enough money for a director to be too picky.  If you’re shooting a video for a client you should absolutely do auditions.  But making people schlep across town just so you can audition them for a video that probably will never be purchased just isn’t fair to the actors.  For sure, a lot of actors will audition for you if you ask them to…which is why you shouldn’t ask them.  If you’re shooting a big, expensive Crash the Super Bowl entry then sure, hold auditions.  That’s a different story.  But if you’re just shooting a little video for for some contest where the prize is $2.500you’re wasting people if you make them audition.  Instead, I recommend doing an over the phone audition. Either that or just cast people that have decent demo reels.

When you’re on the set, your goal should be to waste as little of your actors’ time as possible.  Don’t tell them to show up at the same time as the crew!  There is no reason they need to sit around for three hours while your lighting guys set up.  On a low budget shoot, an actor’s “Call Time” should be about 30 minutes before they will be needed on set.  If you keep things moving, your actors will be happy.  Back in grad school, one thing the teachers drilled into our heads was the idea that the producer must ALWAYS provide meals for the cast and crew.  That’s B.S.  I always provide pop, water and snacks but a meal is overkill.  If your shoot goes longer than 6 hours, you should probably spring for lunch.  But I’ve found that food just slows things down and many actors and actresses don’t want to sit down and eat.  They’d rather just do their part, get their cash and be on their way.

There’s one last thing that you need to decide before you cast actors for your video contest entries.  Should you give them a cut of the prize money if you win?  Sometimes I offer a cut to actors that I have worked with more than once.  (If I cast the same actor twice it means I really, really like them).  But usually I do not give my actors a cut if my video wins something.  Why?  Well, because they already got paid.  As the filmmaker, you are the one taking all the risk and so it’s appropriate that you garner all the reward.

Low Budget Lighting Part Three: Putting it all together

Beardy’s Note: Here now is Part III of Cinematographer Jeremy Applebaum’s Three Part Low Budget Lighting guide.  In case you missed the first two installments you can read them here:  (Part I) (Part 2)  Big thanks to Jeremy for creating this very handy guide.  Remember, if you have an idea for a Guest Post of your own, be sure to send me an e-mail at .  And now, on to Part III…..

First here are the answers to the questions from Part II:

1: 4.16 (dived by volts = 120) or 5 (dived by volts = 100).  2: 2.  3: Yes.  4: No, Around 3.74, largely depending on how you round (dived by volts = 120) or 7 (dived by volts = 100).

In the first part of this series we went over what gear you should invest in for low budget lighting and in the second part we went over some basic electrical safety. This time I’ll explain how to put everything together to light a simple scene.

It should be noted that while stingers, multi taps, and surge protecters would be used in order to power our a lights, a lighting diagram as well as amperage calculations (per circuit) wonʼt be presented here. You should always take note of your amperage draw and be calculating your total draw on the circuit before plugging anything in. With that in mind lets get to work!

Let’s say that we are shooting a commercial for a contest and our script involves two actors; one sitting in a kitchen and the other standing in front on him.  It is to be assumed that our kit contains*:

– 2 Work lights, 1 500 watt fixture, one 1,000 watt fixture (a stand with 2 500 watt fixtures)
– 1 China Ball
– 4 clamp lights
– 5 Pony Clamps
– Clothes Pins
– Tin Foil
– 2 Sheets of each white and black foam board
– Gloves
– Various Bulbs
– Various Stingers, Multi Taps and Surge protecters

A rough diagram of our scene would look something like this:

Note: For these examples the exact wattage of the lamps doesnʼt matter

So were do we begin? The first light that we will need for a our scene is a key light. This is probably the most important light you can place as it determines were all the other sources will come from. What I would do here is take my 1,000 watt work light, place in right hand corner and bounce it off some white foam board (or tinfoil, depending on your tastes) onto the subjects. This would give me a large, soft, directional lighting source that I can then build off for the rest of scene.

While it should be assumed stingers/multi taps would be needed to power our lights, the exact amount needed/used isnʼt important

The next thing I would do is to start adding some fill light. I would proceed by taking my paper lantern and hanging it overheard. This would give me a more even, all around, soft light while not canceling out the effect of the key. It would also help light the background.

I made these images using Google SketchUp and its 3D warehouse. Special thanks goes out to who ever created the templates that I used in creating these diagrams.

So now that we have a strong key light, and a multipurpose fill light it is time to start adding some highlights and more focused fill lights.  While the paper lantern provides overall fill, we will still have a little too much contrast between the key light and the non key light sides.  To remedy this I would then take two clamp lights, and place one at each the opposite side key of our talent.

A china ball is hard to make in that program!

At this point our scene should look good enough that we could go ahead and shoot the commercial. However there a few more things you could do to make our actor or some of the props stand out. One would be to take your clamp lights and use them to highlight certain objects in your scene. You would do this if there was something in your scene you wanted to call special attention to (like the product or something important to the story).

The other thing that you can do would be to place backlights on the talent. The backlights would provide a nice shine to the back of your actors heads and makes them pop out a bit. Be careful though, if your backlight is too bright it can make your whole scene look cheesy.

Yep, that's a lot of clamp lights

Remember that this is just a sample lighting diagram and won’t work for all angels or shots. You may very well have to tweak or move lights out of the way for a different angel. Furthermore this example, while very broad and general may not work for all circumstances and is just to give an idea how these lights can be used.  When on your own shoots you may very well find that you like the look of the scene with only the paper lantern and clamp lights or you may not like the look the paper lantern gives at all! The best way to learn is to go out there and shoot something. Donʼt be afraid to experiment and mess up, itʼs the best way to learn.

If you liked this article, have any questions, or think I missed anything please speak up below.

* This is not to be considered an end all be all kit, just a basic kit with several options to light your scene with.

**You may want to use parchment paper attached with c-47s to soften the lights or a dimmer to control the brightness of the lights. If you do choose to use parchment paper please allow the lamp some room to breath.  You should not allow the parchment paper to directly touch the lamp. CFL (compact fluorescent lamps) lamps wonʼt dim.


—     Guest Post by Jeremy Applebaum. Check out Jeremy’s “Virtual AD” app    —


Interview with Max Traylor of HighlyHumourous.com

This week I’m happy to welcome a new sponsor to VCN, the video contest site HighlyHumorous.com.  Since Highly Humorous is brand new and since they are kind of different than the other video contest sites you might be familiar with, I thought it would be nice to talk to one of the site’s founders, Max Traylor and get the scoop on what’s going on over at HH.

VCN:  So what inspired the creation of Highly Humorous?

MAX:  Well, the five of us (Max Traylor, Adam Hauff, Greg D’Aleo, Jordan Berger, and Tom Blakeley) were about to graduate from business school last year and we knew we wanted to start a business where we could have fun. We saw the success of large video contests like Crash the Superbowl and we knew that video contest websites were getting pretty popular. We also loved watching funny videos on comedy sites like College Humor and Break.com so we started to develop this idea of a video contest comedy website hybrid. It turned out to be a pretty good idea so we ran with it.

VCN:  What do you think sets HH apart from other video contest sites?

MAX:  HighlyHumorous was designed specifically for comedy teams and organized groups of creative filmmakers. Just like Facebook brand pages, a highlyhumorous video channel is an opportunity to showcase what a comedy team can do as a brand. There are thousands of comedy teams out there, each with their own style and tight knit following. HighlyHumorous is a platform where these creative teams and their followings can compete against one another. One of the really unique things about HighlyHumorous is that there is much larger scale competition among the teams than simply one video contest.  We have a leader board, which takes into account the total points that each team has earned from all the competitions that they have participated in.  This allows the teams to compete on a more macro level than any other video contest website.

Sponsoring a contest for a brand means that they are tapping into the energy and organization of these teams AND the communities they are a part of, instead of reaching out to individual filmmakers with a smaller social footprint. Keeping a steady flow of contests also benefits the comedy teams. They have a chance to win cash for their videos, and they build a diverse portfolio for brand advertisements in the process. In a business sense, HH plays cupid for business to business relationships between brands who are in need of creative assets, and brands who specialize in creating engaging material for their fans.

We also try to make the platform more entertaining for viewers by allowing comedy groups to populate their video channels with material not related to our contests. Comedy teams can show off their funniest videos, announce their own live shows, plug their own social networks and websites, and collaborate with others who have the same love for comedy.  Teams also have a wall on their profile where users and other teams can interact with the team and leave comments.  We really wanted to make HighlyHumorous more social and engaging than the other video contest websites that we had seen.

VCN:  How can someone win prizes on HH?

MAX:  There are two ways you can win a prize in a contest. First, you can win the popular vote. When you submit a video to a contest any registered HH user can award that video between one and five stars. The amount of stars or (points) the videos collect determine the popular vote winners. Secondly there is an additional cash prize awarded by a team of judges. Sometimes this panel of judges will include the HighlyHumorous staff, also known as the “High Council”, but it may also include representatives of a sponsoring brand.

VCN:  Some video contest filmmakers are wary of contests that require voting because of cheaters.  What steps have been taken to prevent cheating?

MAX:  Preventing cheating is next to impossible. Anyone can write a silly program that will shoot their video to the top of the voting charts. One of the measures we have taken to keep the game fair is to recognize when a video is collecting illegitimate votes. As soon as a video is submitted to a contest we watch it like a hawk. We know who shares the entry, when they share it, and what networks it goes to. We can then track how many people are interacting with that video and how many are coming back to vote on it. Additionally, we require voters to be registered users on HighlyHumorous.com. We look very closely at the winning entries, who voted for them, and when. We know when someone is collecting illegitimate votes from users that do not exist, and we disqualify them.  Additionally, each registered user of HighlyHumorous can only cast one vote per video and no vote can negatively affect the video’s score.

VCN:  What kind of contests do you expect HH will run in the future?

MAX:  Many of our future contests will feature sponsoring brands that are eager to see what kind of ideas and commercials our creative community can put together. In addition to these sponsored contests we are planning smaller side contests which give our community a little more creative freedom, like parody contests. We will always have something going on to engage our content creators and to provide our viewers with a constant stream of unique videos.

Low Budget Lighting Part Two: Basic Electrical Safety

Beardy’s note:  It’s Friday which means today we’re running Part 2 of Cinematographer Jeremy Applebaum’s excellent Three Part Guest Post about the basics of Low Budget lighting.  And today’s installment is extremely helpful.  If you’ve ever tripped a breaker during a big shoot, now you’ll know why.  In case you missed it, here’s Part 1 of the Low Budget Lighting guide.  And now, on to Part 2:

Part One: Calculating Amps:

Remember, a "Stinger' is an extension cord on a film set.

In the first installment we went over the tools and gear you can pick up in order to build yourself a DIY, low budget light kit.  This time we will go over some basic electrical safety.  Before plugging anything in it is good practice to know where the fuse box is.  And if  it’s an older fuse box you’ll need some replacement fuses in case you trip a fuse.  Even if you closely monitor your power draw, you never know when a refrigerator, furnace, tv, etc will kick on and blow the fuse.  Any standard wall socket socket (circuit) can handle anywhere from 15 – 20 amps.  In order to make sure you donʼt blow a fuse (or trip a breaker) you should always keep track of how many amps you’re plugging into the socket.
 

The formula for calculating amps is:  Amps = Watts / Volts.

 
In America we use 120 volts.  However, when calculating amps for my own shoots, I divide by 100, not 120 for a few reasons.  One, itʼs faster: Itʼs a lot easier to and quicker to divide 500/100 (5) as opposed to 500/120 (4.16).  Two, it keeps my amperage on the circuit down, further reducing my chances of blowing a fuse.  While itʼs important to know that the formula for 100% accuracy, you can almost never go wrong with diving by 100 instead of 120.

Part Two Stinger Safety:

Something to keep in mind when handling power distribution for your scene is that stingers have gauges, which tell the amperage they can handle.  Most off the self stingers will have gauges ranging from 12 – 16.  But the longer the stinger, the less amps they can safety hold.  Below you will find a chart explaining the differences (for America).  If you are not careful your stinger can melt, causing a potential electrical fire.
 

Beardy's note: I went to college with a guy named Max Amps. True story.

As you can see it can get quite complicated if you’re running long stingers.  You can never go wrong buying a higher gauge cord. In fact, unless you are really strapped for cash, you should never buy anything less than a 14 gauge stinger for film work.  The same principle applies to surge protectors and to an extent, multi taps.

And now, some Bonus Questions!  Answers to be posted at the start of next week’s article:

It should be noted that for the purpose of these questions volts are assumed to be at 120.  It is perfectly fine (and recommended) to try solving these problems with volts at 120 and 100 (answers will be given for both). Stinger gauge/max amperage for the distance should be taken from the table above.

1: How many amps does a 500 watt work light draw?

2: If you have 4 500 watt work lights and one 100 foot 16 gauge extension cord, how many work lights can you safely power?

3: If you nearest 20 amp socket (circuit) is 50 feet away, you have a 50 foot 12 gauge stinger, and you need to power 20 amps of light could you safely power your lights?

4: If you have two 15 amp sockets (circuits), one 1,000 watt work light, two 500 watt work lights, two clamp lights with 100 watt lamps in them and two stingers, each 12 gauge 25 footers with attached multi taps could you power all your lights if the closest socket (circuits) is 45 feet away? If not how many more amps would you need?

Feel free to post your answers you may have below.  Same goes for any questions you may have.  Stay tuned for part three where we will go over a basic low budget lighting set up.
 

—     Guest Post by Jeremy Applebaum. Check out Jeremey’s “Virtual AD” app    —


Designed by: Free Cell Phones | Thanks to Highest CD Rates, Domain Registration and Registry Software