.

Posts Tagged ‘tips’

GUEST POST: How to Create a Kick-Ass Music Video: Part One

DAN’S NOTE:  I’ve got a really great guest post for you guys today.  Oh actually, I have half of a great guest post.  This is Part One of director John Scaletta’s guide to creating a kick ass music video.  John runs the production company Motion Source in the Chicago burbs and he’s created some really excellent video contest entries in the last two years.  This Chevy ad that he shot for a Mofilm contest actually aired during the 2010 MLB AllStar game.  John has also produced/directed a good number of music videos and his company’s latest creation is this video for the band The Last Vegas.  I helped out as an extra for that shoot so watch for my cameo!  (I’m drinking at the bar…as usual)  A lot of bands are running music video contests these days so you should definitely read this tutorial before you try and enter one of those contests.  Enjoy Part One and check back on Wednesday for Part Two.

There is no other form of video that I love making quite as much as music videos.  There are two very simple reasons for this:

A.) Music videos are a short-term commitment.  Yes, quite a bit of work goes into them; however, they are not the long-term, oftentimes grueling, marriage of a short film, documentary, or client project.  Music videos are relatively quick to shoot, edit, and ship out into the world.

B.) There is no other form of video production that is as creatively freeing as music videos.  Think about it, music videos are the most commercial of experimental art forms.  People expect them to be innovative, avant-garde, and weird. Get excited, this is the one time that you are allowed to be pretentious!

Due to this love for music videos, my company, Motion Source, has produced quite a few over the last couple of years.  It’s been a fun/stressful ride, and I want to share with you, brave VCN readers, the fruits of that journey.

So, without further ado, here are the ingredients for a kickass music video!

THE CONCEPT

The first thing that you will need to do is listen to song many, many, many times.  Get a feeling for the emotions behind the music.  Additionally, make sure that you have a copy of the lyrics on hand.  If possible, try and discover what it was that motivated the songwriter to write this particular tune: not just what the lyrics are about, but what life forces shaped the track.  All of this is your inspiration.

Now, with this inspiration coursing through your brain, it’s time to come up with a concept.  There is no single method for concept generation, and everyone’s creative process tends to be slightly different; that being said, here are a few of the processes that I rely on:

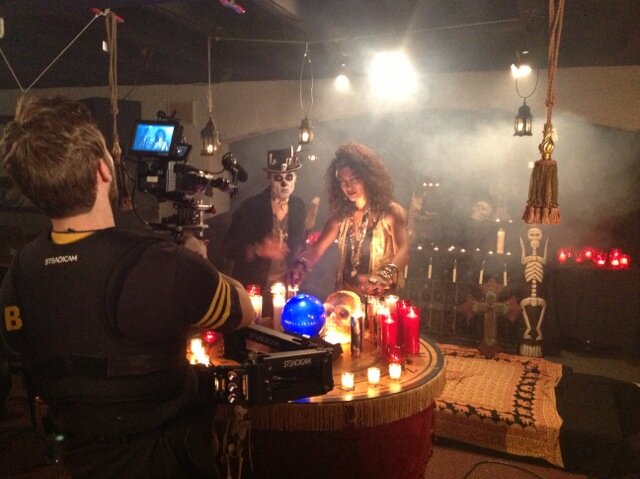
• Dig into history.  Retell a tale from the past, whether it be strange, uplifting, tragic, or beautiful.  An example of this is the most recent video that we produced here at Motion Source, “She’s My Confusion”, which was based upon one of Chicago’s most famous ghost stories, that of Resurrection Mary.

• Create an homage.  Turn to a film, book, or television series that you find intriguing or inspiring.  You can make it a parody, or you can make it a tribute.  I am still waiting to find a song and a budget to tap into for a Battle Royale concept that I’ve had for ages.  My one suggestion here would be to not reference something particularly current, as it tends to feel a bit lazy.  Shakespeare and Say Anything are good; the Walking Dead and Inception, not so good.

• Invert an existing concept.  This is a tactic that constantly intrigues me.  For instance, take something cliche and overdone, like vampires, and find a way to make it fresh through some sort of creative reversal: what about vampire’s that have to give their blood to survive, rather than drink it–maybe not the best example, but you get the idea. A better example would be an Asian film that I vaguely recall wherein the protagonist, rather than being able to read the thoughts of others, could have his thoughts read by anyone within a certain proximity to him. Remember, inversion is interesting.

• Go to extremes.  Music videos are one of the last bastions of anything-goes filmmaking, which means you have a license to get pretty damn crazy.  If you are creating a video for an aggressive song, and want to tap into that aggression, why not take it to the nth degree?  Need an example, check out Biting Elbows’ uber creative .

There are so many different ways to generate concepts; however, the above list should get the ideas rolling.

Now, there is one point I want to make here that is so incredibly important: avoid over-visualization of the lyrics at all costs.  This is the easy way out, and it doesn’t do justice to your contribution to this collaboration of music and filmmaking.  Plus, it generally makes for a fairly boring, run-of-the-mill video.  Let’s face it, how many more videos do we need to see of a guy getting broken up with?  Remember, what you are doing here is trying to capture the essence of the song; and, it is your duty as a filmmaker to filter that essence through your unique vision.  You may have some references to select lyrics, or to the general concept of the song (as we did for The Last Vegas’ “Evil Eyes”), however, don’t show them every word. Got it?

On the set of “She’s My Confusion”

STYLE

Once you have a concept, you will need to decide on a style.

There’s an excellent chance that your concept already strongly suggests a particular style.  For instance, if you have dreamt up a post-apocalyptic tale, the style you opt for might involve harsh contrast, muted colors, and a general grittiness.  I say “might”, as this doesn’t necessarily have to be the case.

We addressed inversion above, and this can be an excellent tactic to apply to the stylistic approach to your video as well.  Instead of selecting a muted grunginess for your post-apocalyptic concept, you could shoot for a totally unexpected, vivid, candy-coated treatment.  This plays heavily on the fact that the human brain craves novelty.  A video whose concept and style stand in harsh opposition can have an excellent chance of standing out from the pack.  Additionally, this conflict can suggest deeper levels of meaning within your piece, if you so choose to venture down that path.

Another benefit of this opposition is that it challenges the audience, and, contrary to what Hollywood would try and convince you of, audiences can find this challenge quite fulfilling.  One of my favorite filmmakers is the Japanese director Kiyoshi Kurosawa, who always had a habit of choosing to keep music out of pivotal scenes, or to utilize a track that seemed diametrically opposed to the mood of the scene.  Why? Well, he wasn’t interesting in telling audiences how they should feel; he either wanted them to figure that out for themselves, or to challenge the feelings that they were expected to have in certain situations.  In short, don’t be afraid to channel some of that Kurosawa genius into your next music video project.

THE SCRIPT

“What! I need a script!”

Yes, you definitely need a script.

“But, this is a music video, won’t an outline cut it?”

Absolutely not.

In some sense it is even more important to have a tightly planned out script for a music video, than it is for a narrative project.  This is because you have a very finite duration that you are working within: the song is as long as however the song is.  You may come up with an incredible concept, say “screw the script”, shoot it, and then rudely awaken to the fact that you cannot possibly fit the entire story into the confines of the song.  From personal experience I can assure you that this sucks, and is guaranteed to take your finished production from a 10 to a 7, or lower.

My personal technique for writing music video scripts is to create a spreadsheet of two columns.  One column is reserved for song timings (e.g. :33 – :45), while the other is dedicated to the segments of the story.  Painstakingly play the song over and over again, fill out and rewrite your spreadsheet until everything has it’s place.  If you take the time to do this, you will end up with what you set out to accomplish.

Remember, there is nothing that will sink a project quite like a lack of pre-production, which leads me to the next topic…

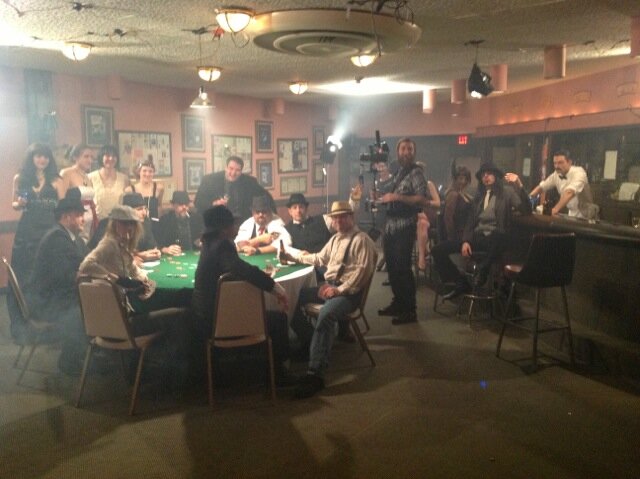
Hey, there’s Dan standing behind the poker table!

THE SHOTLIST

If I am to be honest here, I really don’t have a strong passion for directing.  My true passion is found in the role of the Director of Photography (the crew member responsible for making the vision of the project a reality, through lighting design, camera movement, etc.).  Perhaps it is because of this that I am so intimately married to the idea of the shotlist.  Either way, I would stress that a shotlist is just as important, if not more so, than the script.

Your shotlist should include a detailed breakdown of every single shot you hope to land in the course of filming your music video.  Per shot, it should detail the shot type (wide, medium, close-up, etc.), the lens choice, any movement of the camera, and any other notes that would be helpful in facilitating that specific shot.  This is the shotlist template that I use, as it is the best I have yet to come across.  There is more detail here than is probably necessary, but never forget: too much is better than too little.  And, if you aren’t willing to put in the proper time and energy to make a music video, then go back to sitting on the couch–no one said art was going to be easy.

Not only will the shotlist assist you in conjuring the initial vision within the heat and craziness of the shoot itself, but it will also communicate to your crew specifically what you are looking to accomplish.  The line, “he runs out the door in a burst of fury” can be visualized countless ways; however, if you translate this into the language of a shotlist–protagonist moves through door, track him from behind with a dolly as he exits, use a 21mm lense to increase apparent speed and distance–the number of interpretations slim down exponentially.

A shotlist will also prove invaluable in keeping you on your shooting schedule.  If you are halfway through your day, and have only completed ¼ of your shots, it is time to start doing something differently.  Without fail, there is never enough time on a shoot.  Without fail you will unequivocally need to cut shots.  Without fail, a shotlist will ensure that you cut the right shots, and not the ones that are necessary in telling your story.

I really truly hope that the information above will contribute to you making a kickass music video.  But, not so fast.  We haven’t even begun to cover some of the most critical elements, like locations, crew, and cast.  Stay tuned, as the second, and final post in this series will be up shortly.

And, please feel free to leave comments.  I’d love to hear about any tactics, techniques, and little secrets that you have when it comes to producing music videos.

-

OVC’s tips for being a video contest winner

Sorry the blog has been kind of quiet lately.  I started a new job as an editor this month and I’ve been working like crazy.  (I’ve only had time to watch 4 episodes of the new season of Arrested Development!)  I had to learn Final Cut Pro X really quickly and my brain no think good right now.  So VCN will be a little sparse and sloppy for a while.  But my schedule and my mind should be back to normal soon enough.  In the meantime, I’m just going to share some content that someone else put a lot of work in to.  Each week the folks at my favorite website, Onlinevideocontests.com post a video that lists new and notable video contests.  In a recent special episode they outlined several tips for filmmakers who want to start winning video contests.  Their advice is great and the video is well worth 2:14 of your time.

-

If you’d like to subscribe to OVC’s youtube channel, .

-

How to shoot decent video with an iPhone

The people who set up video contests always want to get as many entries as possible.  Even if most of the entries aren’t very good, a ton of submissions just makes the contest look more successful.  So sponsors usually go out of their way to encourage people of all skill levels to submit videos.  And that’s why you’ll see a lot of contest announcements that include lines like this:

“You don’t need a big fancy camera to shoot an entry.  Just grab your flip cam or iphone and have fun!”

What the sponsors fail to mention is that if “production quality” is part of the judging criteria, the little video you shot with your cell phone probably won’t stand much chance against the slick entries that were shot with DSLRs or HD video cameras.  But as I learned from the video I’m about to post, you actually can get pretty decent footage out of an iphone if you follow a few simple steps.  This tutorial was shot for the youtube channel which is filled with lots of helpful how-to videos.  If you have an iPhone, this video is definitely worth checking out.  But take note: It does start with a lot of yelling and some cheesy but realistic gun play.  So you probably shouldn’t watch this one while at work or while babysitting.


Low Budget Lighting Part Two: Basic Electrical Safety

Beardy’s note:  It’s Friday which means today we’re running Part 2 of Cinematographer Jeremy Applebaum’s excellent Three Part Guest Post about the basics of Low Budget lighting.  And today’s installment is extremely helpful.  If you’ve ever tripped a breaker during a big shoot, now you’ll know why.  In case you missed it, here’s Part 1 of the Low Budget Lighting guide.  And now, on to Part 2:

Part One: Calculating Amps:

Remember, a "Stinger' is an extension cord on a film set.

In the first installment we went over the tools and gear you can pick up in order to build yourself a DIY, low budget light kit.  This time we will go over some basic electrical safety.  Before plugging anything in it is good practice to know where the fuse box is.  And if  it’s an older fuse box you’ll need some replacement fuses in case you trip a fuse.  Even if you closely monitor your power draw, you never know when a refrigerator, furnace, tv, etc will kick on and blow the fuse.  Any standard wall socket socket (circuit) can handle anywhere from 15 – 20 amps.  In order to make sure you donʼt blow a fuse (or trip a breaker) you should always keep track of how many amps you’re plugging into the socket.
 

The formula for calculating amps is:  Amps = Watts / Volts.

 
In America we use 120 volts.  However, when calculating amps for my own shoots, I divide by 100, not 120 for a few reasons.  One, itʼs faster: Itʼs a lot easier to and quicker to divide 500/100 (5) as opposed to 500/120 (4.16).  Two, it keeps my amperage on the circuit down, further reducing my chances of blowing a fuse.  While itʼs important to know that the formula for 100% accuracy, you can almost never go wrong with diving by 100 instead of 120.

Part Two Stinger Safety:

Something to keep in mind when handling power distribution for your scene is that stingers have gauges, which tell the amperage they can handle.  Most off the self stingers will have gauges ranging from 12 – 16.  But the longer the stinger, the less amps they can safety hold.  Below you will find a chart explaining the differences (for America).  If you are not careful your stinger can melt, causing a potential electrical fire.
 

Beardy's note: I went to college with a guy named Max Amps. True story.

As you can see it can get quite complicated if you’re running long stingers.  You can never go wrong buying a higher gauge cord. In fact, unless you are really strapped for cash, you should never buy anything less than a 14 gauge stinger for film work.  The same principle applies to surge protectors and to an extent, multi taps.

And now, some Bonus Questions!  Answers to be posted at the start of next week’s article:

It should be noted that for the purpose of these questions volts are assumed to be at 120.  It is perfectly fine (and recommended) to try solving these problems with volts at 120 and 100 (answers will be given for both). Stinger gauge/max amperage for the distance should be taken from the table above.

1: How many amps does a 500 watt work light draw?

2: If you have 4 500 watt work lights and one 100 foot 16 gauge extension cord, how many work lights can you safely power?

3: If you nearest 20 amp socket (circuit) is 50 feet away, you have a 50 foot 12 gauge stinger, and you need to power 20 amps of light could you safely power your lights?

4: If you have two 15 amp sockets (circuits), one 1,000 watt work light, two 500 watt work lights, two clamp lights with 100 watt lamps in them and two stingers, each 12 gauge 25 footers with attached multi taps could you power all your lights if the closest socket (circuits) is 45 feet away? If not how many more amps would you need?

Feel free to post your answers you may have below.  Same goes for any questions you may have.  Stay tuned for part three where we will go over a basic low budget lighting set up.
 

—     Guest Post by Jeremy Applebaum. Check out Jeremey’s “Virtual AD” app    —


Low Budget Lighting Part One: The Fundamentals

Beardy’s Note:  Today I’m happy to present our third-ever guest blog post.  And it’s actually the first installment in a three part series about lighting low budget video projects!  The series is being written by video contest filmmaker and cinematographer, Jeremy Applebaum.  I’ve worked with Jeremy on a few shoots and the guy certainly knows his stuff.  Last year he handled the lighting for my Crash the Super Bowl entry and I was really impressed with the work he did.  The video was shot outdoors at night next to a campfire so it was an incredibly difficult scene to light.  But check out the final product!  Like I said, the guy knows his stuff.  Oh, and Jeremy also just released iPhone app for filmmakers!  Ok, on with the post…

Lighting on a small budget can be a real challenge. But a nice, professional look doesn’t have to cost you a fortune. In fact, most of what you need can be picked up cheap at your local hardware store. In this installment of the lighting guide, we’ll present some items that every low budget filmmaker should have at their disposal.

Section One: Background Information:

Before we go into the gear, some basic lighting terminology knowledge is needed:

1:  A Key Light, the strongest source in your scene.

2:  A fill light, a light not as powerful as the key but used to fill in the darker spots.

3:  A back or accent light, a light pointed at the back of your subject to make them pop.

4:  A background light, a light pointed at the background so it doesnʼt turn into black mush.

A typical set will have one key light, a few fill lights, several accent lights, and one to two background lights.  All these different lighting sources can purchased inexpensively and off the self at various retailers.

Section Two: Lighting Fixtures:

Disclaimer: It needs to be said that all of this lights can get very hot, so please be careful and use caution when moving and touching these lights.

work it.

The most common low budget (hardware store) light in use would be the work light. At anywhere from $4.99 (and up) for 500 (and up) watts of these are quite a steal. Even more so when you consider that Lowel Tota lamps (bulbs in film are called lamps) can be used instead of the lamp that comes with it.  Work lights are great for lighting a broad area and can be used for anything from key lights, fill lights/accent, and background lights. The main disadvantage of these lights are that they are very difficult to control and unless softened somehow they emit a very harsh quality of light.

Another common low budget light you will see in use would be the paper lantern. These are great as soft fill lights. At around $25 for the whole fixture (lantern, socket, and lamp) these, while a bit pricier than the work light, are still a great deal.  Paper lanterns are great for providing a great soft fill light to your scene. The main disadvantage here is that the only thing they will do is provide soft light and can not be easily controlled or shaped. They also have a huge safety issue, while unlikely, since they are made of paper, if the bulb is too close or touching the sides, the lantern could light on fire.

The Clamps!

The last lighting fixture on this list is an absolute gem and largely unknown to the low budget, DIY type crowd, and this would be the clamp light. While you can get by with one to two work lights, and a china ball, you will need several more clamp lights if you really want to get serious about lighting your scene. At $7.99 (and up, without a lamp) these can get quite pricey. Clamp lights are great because, like the name suggests, they can be clamped almost anywhere making them great for for fill, accent, backlights, and in a pinch, enough of them can provide enough punch to provide a solid key light. A safety issue that should be said is that just because they can be clamped anywhere doesn’t mean they should, always make sure your lights are secure before walking away from them. When in doubt donʼt leave it.

Section Three: Accessories and Lighting Control:

Below are several great options out there for shaping and controlling your lighting sources.

Another clamp!

C Clamps:  C clamps are great for rigging pieces of gear in spots that you couldnʼt get them normally.

Foam Board:  White foam board can used to bounce light onto your subjects (experiment by pointing your work lights at something and then try again, this time pointing your work light at some white foam board and bouncing it back to truly see the effect). Black foam board can be used block (or called flagging) parts of light that you donʼt want hitting your subject.

Clothes Pins:  Clothes pins (c-47s) are great for clipping parchment paper to your lights.

Gloves:  Gloves (or pot holders!) are needed to handle and move your lights during a shoot.

Tin Foil:  Tin foil makes a great shiny reflector. The main difference between tin foil and white foam board is that tin foil will bounce back a more powerful and harsher light. To make a cheap all-in-one bounce board, tape or glue some tin foil to one side on your white foam board.

More clamps? WTF?

Pony Clamps:  Pony clamps are used like clamps for rigging gear, except where c clamps excel at clamping lights, pony clamps are better for clamping foam board and helping secure clamp lights.

Parchment Paper:  Parchment paper makes a great diffuser, clip in front of a work light or clamp light to soften it. Be careful not to clip it too close so it doesnʼt get too hot and start burning up.

Tape:  Masking tape and duct tape are a requirement to have on hand on any set.

Case:  You will also need some sort of case to carry all your gear in. I personally use work totes but almost anything should work. Just be careful how you pack your lamps. You donʼt want to open your case to find smashed lamps and broken glass.

Power:  No lighting kit would be complete without its share of power distribution options. Since most low budget options generally tend to have short cords it would be a good idea to always have a few extension cords (called stingers on a film set) and surge protecters/multi taps on hand to split the power. Furthermore dimmers are great for controlling your fixtures output.

Lamps:  You will need a few different lamps to put in your clamp lights and paper lanterns (work lights come with one to two in the box). It would be good to have several lamps on hand of different color temperatures and wattages.  Make sure you always bring a spare to set you with, you never know when a lamp is going to blow.

Next friday we’ll cover basic electrical safety in Part Two and then in Part Three were we go over some basic lighting techniques.  If you liked this article, have any questions, or think I missed anything please speak up below.
 

—     Guest Post by Jeremy Applebaum. Check out Jeremey’s “Virtual AD” app    —


Tips for using GetOnlineVotes.com

Banner for getonlinevotes.com

I know that a lot of video contest filmmakers hate it when contests let online voting help determine the winners.  So do I.  I can’t even imagine how many contests I would have won if quality was the only thing that mattered to the judges.  But contest organizers LOVE online voting.  Every time a contestant asks for votes on facebook or twitter or on their blog, that’s free advertising for the sponsor.  And you can’t really blame contest organizers for wanting to get as much exposure for their company as possible.  After all, if it wasn’t for the publicity, most companies wouldn’t even bother running a contest in the first place.  So if you want to make money in video contests, you have just got to accept the fact that getting votes is just part of the game.  And once you do, you can start developing strategies to win vote-based competitions.

If you’re really serious about winning a contest, you’ll need to try and get votes from people outside of your social circle.   How do you do that?  Well I suggest you try the site GetOnlineVotes.com.  GOV is what contest junkies refer to as a “vote exchange.”  When a person needs votes in a contest they can post their link on GOV and ask for votes.  Then other people who need votes in other contests vote for that entry.  Then they post a comment that includes their own link and ask the original contestant to vote for them.  So basically, the whole thing is based on the premise, “you vote for me and I’ll vote for you.”

And it works.  It works great, actually.  I just learned abut the site recently but I’ve tried it 2 or 3 times now.  And if you really work the website, you can get dozens or even hundreds of votes from GOV.  But I’ve noticed a lot of people who use the exchange sabotage their chances by making some simple but key mistakes.  So I thought I’d make a quick list of tips to help you get more votes on GetOnlineVotes.com.

  1. Before you post your vote request, make sure that swapping votes does not violate your contest’s rules.  Most contests don’t care where votes come from.  As long as they are getting web traffic or new sign ups or facebook fans, they’re happy.  But some contests prohibit offering “inducements” to get people to vote for an entry.  For example, I was recently in a contest sponsored by Excedrin and they had a “no inducements rule.”  Several contestants used GetOnlineVotes.com and all of them were disqualified!  So for sure, check before you post.

  2. Keep it brief.  GOV gives you the option to say something about you or the contest you’re entering before you post your voting instructions.  You are required to fill in the space so keep it as brief as possible.  One sentence is all you need.  A huge explanation just makes it look like voting for you will be complicated.

  3.  Make your instructions as easy as possible.  A wordy or confusing explanation will just scare voters away.  This seems like a no-brainer but a lot of people over-explain the voting process.  Just post the link, and present STEP 1, STEP 2, STEP 3, etc.  But be aware, if you really do have more than 2 or 3 steps, not many people are going to want to spend so much time on one vote.  The more votes people make, the more they get in return.  Just keep that in mind.

  4. Promise that you will return all votes and ask people to leave their link.  This make other users feel like a vote for you will result in a guaranteed return vote.

  5. Vote for everyone that leaves a comment on your post!  Some jerks will post their request, let people vote for them and then not return the favor.  So let people know that you are voting by replying to all comments.  If other users see that you are replying “I voted!” to every comment, they’ll know you’re good about returning votes.

  6. Work the site.  Vote for other people and leave comments asking for return votes.  But try and focus on only voting for people who will actually vote for you in return.

  7. Consider Re-Listing your Post after a few days.  GOV doesn’t allow you to post the same vote request over and over.  But for just $3.95 you can have your post put back at the top of the list of requests.

I was actually inspired to write this article because I just submitted a vote request to GetOnlineVotes.  So here’s what a nice, simple request looks like:

Click to view the actual listing

Granted, this isn’t exactly a typical GOV request because the “voting’ is done on youtube.  Most of the contests listed on the site are run through facebook.  Still, other GOV users are actually voting for my video.  All I need to do to win the $1,000 “Crowd Favorite” prize in this particular contest is get the most youtube likes.  And I think I can pull it off, fair and square.  I can get a lot of likes through youtube since I have more than 3,500 subscribers.  But GetOnlineVotes.com will probably be the thing that puts me over the top.  Of course, I’d certainly love to get some likes from you VCN readers.  So if you want to help me out, head here and give me a like.  Thanks!

October 24th Update: I won the “Crowd Favorite” prize! Thanks for the votes everybody. I told you GOV works!

MuseOpen: A COPYRIGHT-FREE Music Resource

I have that same wig

See that fancy fellow with the violin?  That’s the Italian composer Antonio Vivaldi.  I was first exposed to Tony V’s music in “Humanities” class during my senior year of high school.  And this exposure happened to occur at a time when my hobby of “making videos” was starting to become a full-blown obsession.  Consequently, Vivaldi’s music as well as a lot of other classical music tracks found their way into my projects.  (In my mind a classical score = artistic depth.)

Years later I learned that by using Vivaldi’s music I was technically committing copyright infringement.  Vivaldi has been dead for 270 years now which means all of his compositions became “public domain” long before my great-grandparents were even born. But in most cases, filmmakers can’t use the work of long-dead composers because the recordings of those pieces are almost always copyrighted.  So you are free to use a Beethoven sonata or a Mozart concerto in your work but the living musicians that performed in those recordings are going to expect to get paid.

Or at least that used to be the case.  The other day I came across a brilliant website named MuseOpen.  Some ingenious and highly motivated person named Aaron Dunn raised enough money through a kickstarter campaign to hire musicians and orchestras to perform popular pieces of Public Domain music.   The musicians had to sign away their rights to the recordings and MuseOpen publishes the music online, for free.

That means the classical tracks featured on MuseOpen are 100% Copyright free!  Filmmakers and other artists are welcome to use those recordings in any way they see fit.  And this is great news for video contest filmmakers. Pretty much every, single video contest you’ll find on the web will require you to get permission before using a piece of music in your entry. And some contests take things a step further by explicitly prohibiting the use of any material that someone else has copyrighted. That means that even if you buy a license for a song, you can’t use it because someone else still owns it. But the songs on MuseOpen are literally owned by no one. No one has any copyright claim to those works.

So MuseOpen is a real bonaza for video contest filmmakers. But take caution when using music from the site. Some of the tracks are so good and sound so professional that video contest judges will probably assume you stole that piece of music. So it’s always a good idea to credit the source. You may want to add a quick title card to the end of your video that explains where the music came from and that it’s totally copyright free. Personally, I always cite my music source in a video’s description box, if possible. But if you really want to err on the side of caution I would advise you to e-mail the contest organizers and explain to them how MuseOpen works and why you are legally allowed to use the music posted there.

Here’s a link to the site: http://www.musopen.org/

You have to sign up if you want to download anything but membership is free.

UPDATE: Check the comments to see read an important note about the copyright status of some of the songs on MuseOpen!

Crash the Superbowl: 7 days to go

Well, we’re getting down to it. If you haven’t shot your entry for the Crash the Superbowl contest but are still planning to do one then you are really cutting things close. About 460 entries have already been submitted so far and let me tell you people something….over the last few weeks I’ve watched every, single one of them! Well, technically I watched at least a few seconds of every entry. After about 5 seconds it’s pretty obvious which commercials are serious entries and which ones aren’t.

So after all these weeks and after watching hundreds of entries, here’s my big conclusion: There are some good spots but I wouldn’t be surprised if none of the videos so far posted make it to the finals. The quality of the submissions is going up and every day now, at least a few decent commercials appear on the site. But out of 460 entries, there isn’t one I would point to and scream, “winner!”

However, in the next 7 days, I’m guessing you’ll see at least 500 new videos get posted. Once it gets to the point that 100 videos a day are going up even I’ll probably have to give up trying to watch them all. Still, don’t let that big number scare you. Seven days is a long time and so if you have an idea, just go shoot it already!

The million dollar winners of last year’s Crash the Superbowl competition were recruited by Doritos to make some tutorial videos for contestants. They’re actually really great videos. If you’re new to video contests I recommend you watch them all. They’ll give you a lot of tips about how to tell a funny, fast, well-produced story in just 30 seconds:

1. Intro to the Crash:
2. Crush the Ad-Meter:
3. 30-Second Joke Telling:
4. Pro Spot on Crash Budget:
5. Copyrights and Wrongs:
6. Film Making 101:
7. Practice Makes Perfect:

Here’s my favorite installment:

30 Second Joke Telling

Good advice for any contest entry you plan on shooting. Keep it short and hilarious.


Designed by: Free Cell Phones | Thanks to Highest CD Rates, Domain Registration and Registry Software