Posts Tagged ‘white’

Putting together a cheap-o Halloween make-up kit

Back in grade school and high school I was one of those kids who’s “thing” was “making movies.”  My friends and I always had some kind of video project in the works but of course we did most of our filming in the summer.  And like most 14 year old screenwriters, we were mainly interested in stuff like monsters, zombies, aliens, serial killers and drunken clowns. (ok, maybe that last one was just me.)  We were shooting our mini-epics long before google or amazon so if we ran out of clown makeup or fake blood in July, we were pretty much screwed.  So every year I really looked forward to the week after Halloween since all the stores would sell their make-up, costumes and props for 50, 60 or even 90% off.  Come November first I would stock up on a year’s supply of stuff like this:

So realistic!

Unfortunately, the days of the “post-halloween” sale are pretty much gone.  In fact, I’ve noticed that some big stores start pulling their Halloween stuff off the shelves BEFORE October 31st!  The reason is that the Christmas season now officially begins on November 1st.  So the masks and costumes need to disappear fast to make room for all the fake trees.

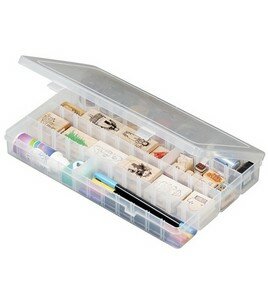
That sucks for several reasons but the good news is that a lot of stores now start reducing the prices on their Halloween merchandise before Halloween. I almost never use effects make-up in my video contest entries so I haven’t stocked up on cheap Halloween make up in many years.  But recently I was in JoAnn Fabrics buying some hot glue sticks or something when I saw a small plastic box with different sized slots in it.

Click the image to order one of these things

It was called an “Art Bin” but for some reason, when I saw it I immediately thought “this would be perfect for storing tubes of Halloween make up!”  It turns out that for the last 15 years or so, I had been subconsciously waiting for a solution to a problem I had when I was a kid.  You see, I always stored my Halloween makeup in a ziplock bag.  And I can still vividly remember how gross that bag got.  I’d open a thing of white makeup, use it and then toss it back in the bag.  So in no time the inside of the bag would be covered in cheap, greasy makeup.

So even though I have almost zero use for effects makeup, I had to buy that box and fill it with $1.00 tubes of fake blood, green and blue makeup and black nail polish.  When it comes to stuff like this, it’s better to have it and not need it rather than need it and not have it.  And actually, there are a lot of things you can do with the kind of cheap Halloween makeup you can buy at target or walmart.  For example, you could do what a lot of filmmakers have done and shoot your own Twilight or Zombie-themed contest entry!  And a little purple and brown makeup can make a pretty realistic bruise or black eye.  Oh you know what else is good to have on hand? A can of white hair spray.  It’s great for giving scientist or politician characters a little extra pizazz.  However you probably want to avoid featuring realistic blood, gore or injuries in MOST of your video contest entries.  I say “most” of your entries because every so often, I’ll see a video contest that kind of has a hardcore edge to it.  So if a contest is kind of edgy, you could push the envelope a bit and include a little violence just for the shock value.

If you actually try and put together a low-budget, effects makeup kit of your own, there are a few other items you should include.  If you see spirit gum and spirit gum remover in the Halloween isle, grab some.  That stuff can come in really handy.  And while your at it you might as well buy a few fake mustaches.  Why?  Because fake mustaches are freaking funny, that’s why.  To finish off your kit you’ll want to add some Q-tips, makeup sponges, and wet naps.  And or of course, you can’t forget the toothpicks!  Toothpicks are how the pros scratch themselves so that their makeup won’t smear.  But I bet you already knew that.

If you’re like me, once your $7 makeup kit is complete, you’ll look at it, feel proud for about five seconds and then you’ll shove the box into the back of your closet.  I doubt I’ll actually use any of the stuff in my kit but next summer if I find myself inspired to shoot a video contest entry about a mime or a vampire or a sports fan with a painted face, I’ll be good to go.

DSLR FRIDAY: (China) Balls of Fury

Made in China, I assume.

I shoot my video contest entries with a DSLR for one reason and one reason only: It’s cheap.  My Canon T2i cost me about $900 and shoots full 1080 HD footage.  Compared to a $5,500 Panasonic HVX200, that’s a ridiculous deal.  Yeah, you lose a ton of features (like decent audio capabilities) when you don’t shoot with a real “video camera” but unless you’re a well-stocked pro, a DSLR is the best, most affordable option around.

So if your only video camera is a DSLR, you’re probably doing your filmmaking on the cheap.  Which means you need to come up with some low-cost solutions to the challenges that DSLR shooting presents.  One weird thing I’ve noticed about my DSLR is that it hates shadows.  It’s really unforgiving if you use a strong light source.  If you don’t diffuse your lights (including the sun) you’re going to get some stark shadows, especially under your subject’s eyes.  I’ve found that a great, cheap way to soften the look of a video is with one of the oldest tricks in the book: China Balls.

It seems like at least one a year I talk to a filmmaker or read a film book that recommends lighting a scene with a China Ball.  You know what China balls are right?  Those big white, paper balls that you put a light into?  (By the time you read this I probably will have added a giant picture of a china ball to this post)  For some reason I never heeded the advice of those China Ball evangelists.  But now I am a convert!  I started using them a few months ago and the results are pretty sweet.  Check out this video I shot for the Insinkerator assignment that Poptent ran back in the spring.  This entire video was lit with China Balls and natural room light.  Oh actually, the shot of the happy baby was done by my long distance collaborator, HappyJoel.  He did the adorable song for this too.  But the rest was done by me and my big, white balls:


Is that some even lighting or what?  Check out the shots of the “snacks” at the 19 second mark.  There isn’t a hint of shadow on that table.  That’s the magic of the china ball.  You can find a lot of tutorials online that explain how to build a China Ball light but here’s how I built mine:

Also probably made in china

Step 1:  You can order a china ball online here but I just went to Pier One Imports.  I bought 2 decent sized balls for like 16 bucks.

Step 2:  Head to Home Depot (ok, I prefer Menards but I think that’s a mid-western chain) and buy a cheap clamp light like the one in this picture.

Step 3:  While you’re at Menards (or wherever) pick up a 300 Watt clear or white light bulb.

Step 5:  The rest is pretty self-explanatory.  Rip that silver dish part off your light.  Pop open your China ball and put it’s metal support in.  Then put the socket into the ball and shove the cord into the ball’s cord holder bracket thing.

And that’s that.  Now the disclaimer.  BE CAREFUL!  The thing you just built is really goddamn dangerous!!  Most China Ball tutorials will tell you to use a 100 Watt bulb max.  But 100 Watts will only be enough if you want “moody” lighting.  You want to light up the night!!  But if that 300 Watt bulb touches that paper ball you’re fucked.  It’ll start smoking in a few seconds if the bulb has been on for a while.  So if you’re stupid enough to actual build this ball of death, here are the precautions you will need to take:

1.  Always make sure the bulb is hanging in the dead center of the ball.

2.  Always turn the light off when not filming.

3.  Always have a fire extinguisher on set.  (You should always have one whenever you’re setting up hot lights, actually)

So now that you’ve got your ball you’ll need to hang it from something.  A pro or semi-pro would probably stick it on a a “C-Stand” like this one. But one of those suckers will run you $165!! Screw that noise.  I just hang my China Ball from this a simple boom mic stand.  Here’s a picture of the exact mic stand I use.  Guess how much it cost?  Less than 30 bucks!  You can even buy one at Best Buy.  And let me tell you, this thing is perfect for hanging china balls.  It can extend really high so you can get the ball all the way to the ceiling (to mimic a room’s actual light source.)  Plus, the thing is super light weight and can fold up and fit in your car trunk.  A old fashioned C-Stand is so awkward and weighs so much that if you knocked one over you could break somebody’s nose.  So these mic stands are 500 million times better for suspending china balls then a big ass metal stand.

You know what?  I’ve been thinking about it and my version of the China Ball is just too dangerous to actually attempt to build and use.  So please do not build the lighting device I just explained how to make.  For the record, this post is intended for entertainment purposes only and if you burn your house down, it’s not my fault.

Designed by: Free Cell Phones | Thanks to Highest CD Rates, Domain Registration and Registry Software