. SekwanaComics_VideoContest_Banner

Archive for the ‘Tips and Tricks’ Category

Help Kickstart this clever, low-budget camera rig

Some production pals of mine are running a Kickstarter to help fund the production of the cool new camera rig they designed.  They sent me a prototype a few weeks ago and the thing is super handy.  It’s great for shoulder-mounted shooting but there are lots of other tricks you can do with this thing.  I’ll let the  Motion Source team explain the benefits and attributes of the rig:

These guys have set a very achievable kickstarter goal; they want to raise $1,000 so they can buy a machine that will help their manufacturer produce the rigs faster.  The campaign has only been active for a few days but already they’ve raised more than 900 bucks!  You can probably attribute their success to the rewards they’re offering to contributors.  If you kick in $29 they will donate one of the rigs to a the Chicago film school of your choice and if you donate $69 (heh) or more you’ll receive one of the very first finished rigs.  That’s a pretty good deal since these will cost closer to 100 bucks when they officially go on sale.

If you want to contribute, or if you’d like to see more videos of the rig in action, head here:  http://www.kickstarter.com/projects/motionsource/the-motion-source-shoulder-rig-for-dslr-and-video
-

How to increase your video’s view count by hacking youtube!

Youtube hates this kid!  This uber-leet haxxor wants to make your dreams of viral success (seem) to come true.  Watch his video to learn the one weird trick that will cause your youtube view counts to (briefly) skyrocket!

Ok, that was obviously one of the dumbest things I’ve ever posted.  But for some reason it just cracked me up the first time I saw it.  To be totally honest, this is exactly the kind of cool “hacking” tutorial I would have posted if youtube existed when I was 11.  (Except even at age 11 I would have known to shoot it horizontally)  This tip may be pointless and goofy but I bet you’re thinking about trying it for yourself.  I’m not ashamed to admit that I already did.  Here’s a screenshot of some random video I took at an amusement park last year…

-

Can you believe that shizz!?  I hit the 17 Billion views mark!  Yeah obviously this is completely phony but for one brief moment I got to know what it would feel like to be 10 times more popular than Lady Gaga and Charlie the finger-biter combined!

-

Hipster Videography 101: The Art of Lens Whacking

When future film students start writing papers creating virtual reports about the visual styles of the 20-teens, those kids are going notice a whole lot of lens flares and light leaks.  Right now, that dreamy, home movie-esque, Instagram-y look is all over the place.  Most hipster photographers and videographers just slap some filters on their photos and videos and call it art.  But you’re no poser so if you want want flares and light leaks, you should lean how to create them for real by “whacking” your DSLR’s lens.  posted a great tutorial about the Art of Lens whacking and the site describes the practice thusly*….

Lens whacking, also called free lensing, is a method of shooting with the lens detached from the camera body. It allows light leaks, creates a tilt shift focus effect, and adds a dreamlike, vintage quality to your footage.

Here’s what a lens-whacked video looks like.  If you can master this little trick you should be able to create some seriously cool looking footage:

-

from on .

Vimeo says that entire video was shot with the lens detached from the camera.  Here’s how the trick works:

Normally the only light that hits your camera’s sensor is filtered through the lens. When you remove the lens, light can hit the sensor from many different angles. If too much light is let in your image will be over-exposed and hard to make out – but if you let just a bit in, you’ll get some lovely lens flares and light leaks.

Now that you’ve read these descriptions you probably already understand how to whack your lens.  Basically you just detach your lens from your DSLR and then hold it in place while you shoot.  If you tilt it a little, light will leak in through the opening.  Vimeo does a very thorough job of describing how to correctly whack your lens so to read the full tutorial.

*Please note, “thusly” is not exactly a real word.  So every time you say it, stuck up people will think you’re dumb.  But screw those pretentious jerks because “thusly” is a fun word and you should use as much as you want.

-

GUEST POST: How to Create a Kick-Ass Music Video: Part Two

Dan’s Note:  Wednesday has arrived and so as promised, here’s the second half of director John Scalleta’s guide to creating a kick-ass music video.  Here’s Part One in case you missed it.  Let’s start things off with a music video that John’s company Motion Source produced for The Last Vegas track, Evil Eyes.  Part Two begins below.

I’m back again and ready to take you through a whole new slew of details that you are going to need to consider when seeking to shoot a kickass music video. If you haven’t already read the first post in this series, I would urge you to do so now, as what you are about to read builds off of a foundation set there.

So what’s next? People, places, and things.

CREW

Before you have anything else, you are going to need a crew. If it’s a concept that is fairly simple to execute, you may only need an assistant of some sort; if your sights are set a little higher, there is a good chance that you are going to need a solid team to bring your vision to fruition. And, when no one is getting paid, it can be quite difficult to assemble said team; however, here are some suggestions:

• Work on other people’s projects. Scour Craigslist, talk to your friends in film school, and generally do whatever you need to do to locate a filmmaker in need of help. Indie filmmakers subscribe heavily to the philosophy that one hand washes the other; and if you help out a fellow brother in arms, there is a very, very good chance that they will help you out when the time comes.

• Use your friends. Your friends may not know anything about filmmaking, but they can sure as hell hold a reflector or lug gear around. Just make sure that you are fair to them, and don’t act like a ridiculous dictator. Additionally, you need to make sure that they understand you have a mission to accomplish, and that this isn’t just an extension of hanging-out. With this in mind, you’ll know the right friends to ask.

• Offer a cut of the take. If you are creating this video for a contest and there is money at stake, consider dividing up the pie. Offering major crew members a percentage of the winnings is often all that is needed to convince talented indie filmmakers to sign on. And, a lot of times the people that you invite to take part might have their own equipment that they would be willing to bring out for the video, as they now have a stake in the game.

And, one final note about crews. You may not have to pay them, but you sure as hell have to feed them. Pushing your crew to the limit and not tending to their basic animal needs does nothing but prove to them they are no more than a tool to you. Plus, hungry people are weak and grumpy–both bad things.

A word to the wise here: please avoid serving pizza or Jimmy John’s! These are too often the staple foods on set, and every filmmaker I have ever met is sick to death of them.

TALENT

Actors are a dime a dozen; good actors are like needles in a haystack; great actors are about as easy to locate as a unicorn. This being said, you are in luck! Your actors don’t need to memorize, and convincingly deliver, lines of dialogue; they simply need to emote. We all emote constantly, and most of us can be guided to emote in a particular style with a little bit of time and patience. The main criteria that I have when seeking talent for a music video is look: who can I find that has the appropriate look for the character that I envision? Remember, they don’t need to deliver dialogue like De Niro, they simply need to have the right look, and look the right way at the right moment.

Just as you dream of one day getting paid hundreds of thousands of dollars to produce music videos, actors fantasize about the day they will be cruising down the French Riviera in an electric yacht on the phone with Steven Spielberg. What I am trying to communicate here is that we all need to start somewhere–we all need to build a springboard to take us where we want to go. Actors, especially those starting out, will oftentimes agree to be a part of your project, because they understand the importance of building a portfolio. This being said, it is totally unacceptable to offer an actor a part in a project if you yourself are not 110% invested in it. If you are, in fact, 110% invested, actors will feel that and easily catch your passion.

So where can you find talent to fit the roles of your story?

• Craigslist. This is often the obvious first choice; however, I have to tell you that I have interacted with so many flakes via Craigslist that I have completely sworn it off at this point. This doesn’t mean that you can’t be successful with it, it simply means that you need to be careful. Before you commit to bring a Craigslister onto your project, ask to see some of their other work to validate that they are invested in their craft. Additionally, it helps to get on the phone with them and get a feel for whether they are a total weirdo flake or not.

• Model Mayhem. Having sworn off Craiglist, I tend to use Model Mayhem. If you have never visited Model Mayhem before, it is a site that seeks to facilitate collaborations between models, photographers, hair stylists and the like. The thing I’ve found is that most models are also aspiring actors; additionally, the users of Model Mayhem depend upon positive experiences and effective networking to build their career, and are therefore much more likely not to flake out on you.

• Anyone is game. Seriously, anyone. More often than not the talent in the videos that we produce is composed of friends, family, acquaintances, etc. Again, most people can be guided to emote, so you just need to make sure that you build enough time into your shoot day to successfully work with a non-professional. One word of warning here, as you probably already know, filmmaking saps massive amounts of time and energy, so it doesn’t pay to
bring out your high-maintenance sister who needs to be home by 8 to watch the Real Housewives. Find people that will not only be willing to go the distance, but will be excited to be running alongside you.

LOCATION

Alright, I know that I told you to go wild with the concepts you create–to get crazy artistic. But, if your vision dictates a location that is impossible for you to find, much less access, then your entire project is dead in the water. It is due to this that I oftentimes construct concepts around locations that I know I will be capable of accessing, or that I am fairly confident I can find and convince the owner to work with me on. I strongly, strongly, strongly suggest that you do the same. Sorry to come up a little hypocritical here, but location drives a video in my opinion.

Perhaps you find the perfect diner for your story, and convince the owner to let you shoot there after hours. Then, you show up the day of with equipment, crew, talent, and props, and the location owner gets cold feet. Well, that sucks! A situation like this isn’t isolated, it is the stuff of indie filmmaking nightmares. Therefore, if your initial interaction with a location owner feels a bit like pulling teeth, move on. You do not want to work with location owners who are anything but accepting or excited about your project. This may sound a bit improbable, but truth be told, there are a lot of wonderful people out there who would be extremely excited about their space being featured in a video.

Just remember to be respectful to, and upfront with, a location owner. If you are going to be shooting an orgy sequence, you need to let them know this, because sooner or later they are going to find out anyway. Plus, being less than transparent just makes you a jerk. You are asking for a major favor here, and owe it to the grantee of that favor to do whatever is in your power to make the process as easy and non-threatening as possible.

Another tactic that you can use to inspire excitement and acceptance in a location owner is to barter your services. You know how to shoot video right? Well, what about putting that skill into service for them in exchange for access? If you need to shoot a scene in a salon, perhaps the owner of said salon would be extremely interested in having a profile video for their website made in trade. This is, of course, quite a big commitment in terms of time and energy, but who ever said art came without suffering? Remember, one hand washes the other.

And, a final point about locations: make certain that they meet the technical requirements of your shoot. You may find the perfect motel for your horror themed video, but does this rickety old building have the power to accommodate the lights you will be using, or will you be blowing fuses left and right? These are the kinds of questions you need to answer before you ever consider a location a reality.

PROPS

So you’ve got your people and places, now you need your things.

Props work hand in hand with your location to conjure the world that your story takes place in. If said story takes place in a fairly mundane world, you may have every prop you will need scattered throughout your house. One the other hand, if you are telling a tale of Medieval intrigue, you are definitely going to need to go on a quest for props.

Recently, we completed a music video for the band The Last Vegas, which was predominantly a period piece. This meant that we needed to drum up a number of specific props, many of which weren’t readily available to us. Therefore, we had to get creative, and here is how we did that:

• Witchdoctor Hat: Where do you find one of these suckers? We called upon a particularly crafty friend of ours to take a party-store top hat and turn it into precisely what we needed. Not only did the prop turn our fantastic, but our friend had a great time creating it, and was super excited to see it featured in the video. We all have artsy friends, this is the time to call on their craft.

• Antique Slot Machines: In a desperate bid to find these ancient items we slapped a post up on Facebook looking for any friends that might be able to help us pull this off. Low and behold, the very creator of this site, Dan, has a close friend who collects these fossils. Not only were we able to score 2 period specific slot machines, but we also got 2 period specific extras in Dan and his friend Rod, who came out with the machines and gladly stepped in as
gambling den patrons.

• Showgirl Headdresses: Good old ebay for this one. Remember, you can find anything on ebay, and then you can find a cheaper knock-off that generally serves the purpose just as well.

• Voodoo Tabletop: This is a weird one, I know. All we did here was to ask around; not online, but in person. We asked friends and acquaintances if they had any idea of someone who might have an item like this. To our surprise, a friend of a friend of a friend threw an annual haunted house, and was more than happy to show-off the one-of-a-kind voodoo tabletop he had made as a prop.

This brings me to a very important tactic: one of the absolute best places to locate props are antique stores. Many of these places might as well have a sign hung out front that says “Prop House” rather than “Antique Market”, as they can be that valuable to the indie filmmaker. If you are polite and enthusiastic with the owners of one of these stores, they will often agree to rent or loan you pieces of their stock. However, this often takes developing a relationship. Let them know who you are, and why it is you do what you do. Show them some of your previous work, so that they can feel secure that you are legit. And, if need be employ the same trade suggested in the location section: produce a video for them.

People are often very excited about their things, especially when those things are unique. This means that they can be extremely protective of their possessions, but it also means that they can be surprisingly eager to have them showcased in a video. For instance, we have developed a number of contacts with collectors of antique and vintage cars, all for use within an upcoming project. These auto-lovers are totally into the idea that we are as excited about their darlings as they are. Show that excitement, and win over a potential donor.

That concludes our tour of what it takes to produce a kickass music video. There are so many other details that could be covered here, but if you adhere to the points covered in this post, and the previous, you will have a rock solid foundation to begin building off of. Beyond anything else, remember to use this as an opportunity to be fully creative; and have a flippin ball! Making music videos is a blast–now get out there and start shooting.

Good luck!

-

GUEST POST: How to Create a Kick-Ass Music Video: Part One

DAN’S NOTE:  I’ve got a really great guest post for you guys today.  Oh actually, I have half of a great guest post.  This is Part One of director John Scaletta’s guide to creating a kick ass music video.  John runs the production company Motion Source in the Chicago burbs and he’s created some really excellent video contest entries in the last two years.  This Chevy ad that he shot for a Mofilm contest actually aired during the 2010 MLB AllStar game.  John has also produced/directed a good number of music videos and his company’s latest creation is this video for the band The Last Vegas.  I helped out as an extra for that shoot so watch for my cameo!  (I’m drinking at the bar…as usual)  A lot of bands are running music video contests these days so you should definitely read this tutorial before you try and enter one of those contests.  Enjoy Part One and check back on Wednesday for Part Two.

There is no other form of video that I love making quite as much as music videos.  There are two very simple reasons for this:

A.) Music videos are a short-term commitment.  Yes, quite a bit of work goes into them; however, they are not the long-term, oftentimes grueling, marriage of a short film, documentary, or client project.  Music videos are relatively quick to shoot, edit, and ship out into the world.

B.) There is no other form of video production that is as creatively freeing as music videos.  Think about it, music videos are the most commercial of experimental art forms.  People expect them to be innovative, avant-garde, and weird. Get excited, this is the one time that you are allowed to be pretentious!

Due to this love for music videos, my company, Motion Source, has produced quite a few over the last couple of years.  It’s been a fun/stressful ride, and I want to share with you, brave VCN readers, the fruits of that journey.

So, without further ado, here are the ingredients for a kickass music video!

THE CONCEPT

The first thing that you will need to do is listen to song many, many, many times.  Get a feeling for the emotions behind the music.  Additionally, make sure that you have a copy of the lyrics on hand.  If possible, try and discover what it was that motivated the songwriter to write this particular tune: not just what the lyrics are about, but what life forces shaped the track.  All of this is your inspiration.

Now, with this inspiration coursing through your brain, it’s time to come up with a concept.  There is no single method for concept generation, and everyone’s creative process tends to be slightly different; that being said, here are a few of the processes that I rely on:

• Dig into history.  Retell a tale from the past, whether it be strange, uplifting, tragic, or beautiful.  An example of this is the most recent video that we produced here at Motion Source, “She’s My Confusion”, which was based upon one of Chicago’s most famous ghost stories, that of Resurrection Mary.

• Create an homage.  Turn to a film, book, or television series that you find intriguing or inspiring.  You can make it a parody, or you can make it a tribute.  I am still waiting to find a song and a budget to tap into for a Battle Royale concept that I’ve had for ages.  My one suggestion here would be to not reference something particularly current, as it tends to feel a bit lazy.  Shakespeare and Say Anything are good; the Walking Dead and Inception, not so good.

• Invert an existing concept.  This is a tactic that constantly intrigues me.  For instance, take something cliche and overdone, like vampires, and find a way to make it fresh through some sort of creative reversal: what about vampire’s that have to give their blood to survive, rather than drink it–maybe not the best example, but you get the idea. A better example would be an Asian film that I vaguely recall wherein the protagonist, rather than being able to read the thoughts of others, could have his thoughts read by anyone within a certain proximity to him. Remember, inversion is interesting.

• Go to extremes.  Music videos are one of the last bastions of anything-goes filmmaking, which means you have a license to get pretty damn crazy.  If you are creating a video for an aggressive song, and want to tap into that aggression, why not take it to the nth degree?  Need an example, check out Biting Elbows’ uber creative .

There are so many different ways to generate concepts; however, the above list should get the ideas rolling.

Now, there is one point I want to make here that is so incredibly important: avoid over-visualization of the lyrics at all costs.  This is the easy way out, and it doesn’t do justice to your contribution to this collaboration of music and filmmaking.  Plus, it generally makes for a fairly boring, run-of-the-mill video.  Let’s face it, how many more videos do we need to see of a guy getting broken up with?  Remember, what you are doing here is trying to capture the essence of the song; and, it is your duty as a filmmaker to filter that essence through your unique vision.  You may have some references to select lyrics, or to the general concept of the song (as we did for The Last Vegas’ “Evil Eyes”), however, don’t show them every word. Got it?

On the set of “She’s My Confusion”

STYLE

Once you have a concept, you will need to decide on a style.

There’s an excellent chance that your concept already strongly suggests a particular style.  For instance, if you have dreamt up a post-apocalyptic tale, the style you opt for might involve harsh contrast, muted colors, and a general grittiness.  I say “might”, as this doesn’t necessarily have to be the case.

We addressed inversion above, and this can be an excellent tactic to apply to the stylistic approach to your video as well.  Instead of selecting a muted grunginess for your post-apocalyptic concept, you could shoot for a totally unexpected, vivid, candy-coated treatment.  This plays heavily on the fact that the human brain craves novelty.  A video whose concept and style stand in harsh opposition can have an excellent chance of standing out from the pack.  Additionally, this conflict can suggest deeper levels of meaning within your piece, if you so choose to venture down that path.

Another benefit of this opposition is that it challenges the audience, and, contrary to what Hollywood would try and convince you of, audiences can find this challenge quite fulfilling.  One of my favorite filmmakers is the Japanese director Kiyoshi Kurosawa, who always had a habit of choosing to keep music out of pivotal scenes, or to utilize a track that seemed diametrically opposed to the mood of the scene.  Why? Well, he wasn’t interesting in telling audiences how they should feel; he either wanted them to figure that out for themselves, or to challenge the feelings that they were expected to have in certain situations.  In short, don’t be afraid to channel some of that Kurosawa genius into your next music video project.

THE SCRIPT

“What! I need a script!”

Yes, you definitely need a script.

“But, this is a music video, won’t an outline cut it?”

Absolutely not.

In some sense it is even more important to have a tightly planned out script for a music video, than it is for a narrative project.  This is because you have a very finite duration that you are working within: the song is as long as however the song is.  You may come up with an incredible concept, say “screw the script”, shoot it, and then rudely awaken to the fact that you cannot possibly fit the entire story into the confines of the song.  From personal experience I can assure you that this sucks, and is guaranteed to take your finished production from a 10 to a 7, or lower.

My personal technique for writing music video scripts is to create a spreadsheet of two columns.  One column is reserved for song timings (e.g. :33 – :45), while the other is dedicated to the segments of the story.  Painstakingly play the song over and over again, fill out and rewrite your spreadsheet until everything has it’s place.  If you take the time to do this, you will end up with what you set out to accomplish.

Remember, there is nothing that will sink a project quite like a lack of pre-production, which leads me to the next topic…

Hey, there’s Dan standing behind the poker table!

THE SHOTLIST

If I am to be honest here, I really don’t have a strong passion for directing.  My true passion is found in the role of the Director of Photography (the crew member responsible for making the vision of the project a reality, through lighting design, camera movement, etc.).  Perhaps it is because of this that I am so intimately married to the idea of the shotlist.  Either way, I would stress that a shotlist is just as important, if not more so, than the script.

Your shotlist should include a detailed breakdown of every single shot you hope to land in the course of filming your music video.  Per shot, it should detail the shot type (wide, medium, close-up, etc.), the lens choice, any movement of the camera, and any other notes that would be helpful in facilitating that specific shot.  This is the shotlist template that I use, as it is the best I have yet to come across.  There is more detail here than is probably necessary, but never forget: too much is better than too little.  And, if you aren’t willing to put in the proper time and energy to make a music video, then go back to sitting on the couch–no one said art was going to be easy.

Not only will the shotlist assist you in conjuring the initial vision within the heat and craziness of the shoot itself, but it will also communicate to your crew specifically what you are looking to accomplish.  The line, “he runs out the door in a burst of fury” can be visualized countless ways; however, if you translate this into the language of a shotlist–protagonist moves through door, track him from behind with a dolly as he exits, use a 21mm lense to increase apparent speed and distance–the number of interpretations slim down exponentially.

A shotlist will also prove invaluable in keeping you on your shooting schedule.  If you are halfway through your day, and have only completed ¼ of your shots, it is time to start doing something differently.  Without fail, there is never enough time on a shoot.  Without fail you will unequivocally need to cut shots.  Without fail, a shotlist will ensure that you cut the right shots, and not the ones that are necessary in telling your story.

I really truly hope that the information above will contribute to you making a kickass music video.  But, not so fast.  We haven’t even begun to cover some of the most critical elements, like locations, crew, and cast.  Stay tuned, as the second, and final post in this series will be up shortly.

And, please feel free to leave comments.  I’d love to hear about any tactics, techniques, and little secrets that you have when it comes to producing music videos.

-

Why I’m switching to Final Cut Pro X

Meet my new best friend

Last month I managed to fall ass-backwards into a new job.  A friend told me that the production company he works for was looking for a new full time “off site” editor.  I asked what “off site” meant and he said some of their editors work from home on their own systems.  They just stop in the office once a week to pick up new assignments and then they do the work whenever they want.  I wasn’t really looking for a new job but “work at home” and “whenever you want” was all I needed to hear.  So I applied and did an interview and before I knew it I was hired.  I was kind of surprised that I actually got the job because my friend told me that I’d have to do all of my work in Final Cut Pro X.  During my interview I explained that I had lots of experience with Final Cut Pro 7 but Final Cut Pro X was almost completely foreign to me.  But the head editor guy told me that wasn’t a big deal at all.  There aren’t a lot of editors out there that are using Final Cut Pro X so they usually just hire people who “come from” Final Cut Pro and then train them how to use FCPX.

When Final Cut Pro X debuted in 2011, I tried a free trial version and I flat out HATED it.  I hated it so much that I uninstalled the 30 day demo after about 90 minutes of use.  The initial reviews for Final Cut Pro X were pretty negative and most pros seemed to feel like the software just wasn’t good enough for them.  Probably the biggest complaint was that FCPX didn’t feel like Final Cut Pro anymore.  It felt more like a semi-pro version of iMovie.  And iMovie is what your aunt uses when she wants cut together clips of her cats sneezing.  So why would a pro want to use something aimed at amateurs?

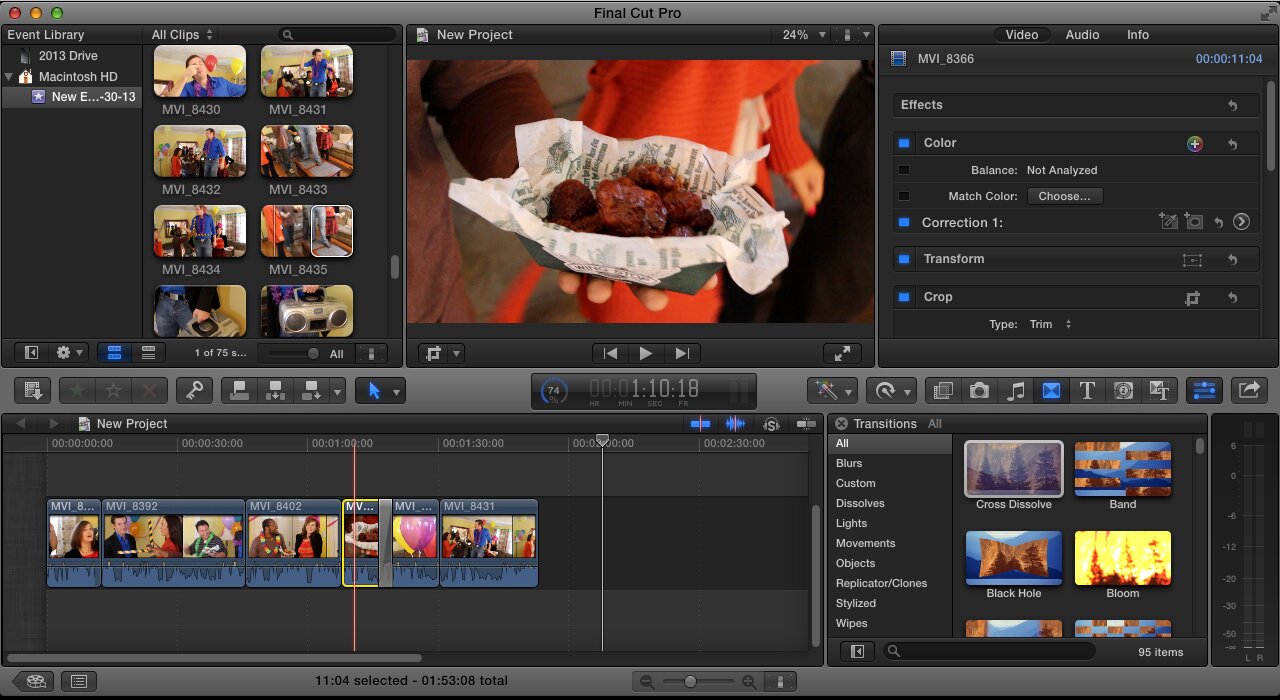
Final Cut Pro X in action.  Click to enlarge.  The footage is from a contest entry I did last year.

So I was a little freaked out that I’d have to abandon FCP7 and start over learning a new program that I had previously found to be weird and annoying.  I didn’t want to look like a total idiot during my week-long training so I downloaded the trial version of FCPX from the apple store and tried to teach myself how to use it.  My first day with the program was brutal.  Many features that I always took for granted have been removed or changed.  Final Cup Pro X was built “from the ground up” which means it isn’t just a new and improved version of Final Cut Pro.  The two programs are very, very different and you can’t even open FCP projects in FCPX.

So I spent the first two hours being angry and frustrated because I couldn’t use FCPX like I used FCP7.  But after about 4 hours my hate and anger subsided.  And every time I learned a new trick I felt a little more comfortable.  After about 8 hours I knew that I’d be able to work with this program.  And then to my surprise, after 40 hours I realized that I’d never go back to Final Cut Pro.  Forget all those snarky reviews you read back in 2011 because Final Cut Pro X is simply an excellent piece of software.  It solves numerous problems that you don’t even realize are problems.  A lot of reviewers bagged on FCPX because it felt like a dumbed-down version of Final Cut Pro.  But it’s not dumbed-down.  It’s just simplified and simplified is good!  Both programs do all the same stuff.  FCPX is just sleeker and more user friendly.  Here’s a quick rundown of some of the most important changes.  If you’ve never opened FCPX before, these are the features that are going to piss you off/freak you out until you get used to them.

The Timeline Layout:  FCPX’s timeline is radically different from FCP7′s timeline.  Take a look at that screenshot I posted.  Notice anything that’s missing?  There are no numbered Audio and Video tracks.  That stressed me out at first but eventually I grew to like the way the new timeline forces me to stay organized.  In FCP I would leave clips all over the place.  But FCPX wants you to keep as many clips as possible in the main “storyline” track.  You can move clips above and below but I keep most of my work on the Storyline.  Another notable change; audio and video clips stay connected.  So basically, the Storyline track is an audio/video combo.  That’s really helpful because now you don’t have to scroll down and hunt for the audio that’s connected to the video clip you’re working on.  And finally, FCPX gives you a lot more control over how your clips look on the timeline.  Instead of giving you just one tiny thumbnail, you see a whole strip of images.  And if you want to focus on the audio, you can hide the video portion and enlarge the clips so you can see the waveforms.

Sound Editing:  If you wanted to edit a clip’s audio track in FCP7 you would double click on it and then work on it in a special window.  But in FCPX, you do your audio editing on the timeline.  At first I thought this was ridiculous because the clips would be too small to make super-precise edits.  But you can enlarge your clips and zoom in like crazy.  So adding and adjusting keyframes is very comfortable and convenient. 

The Magnetic Timeline:  It seems like a lot of people hate FCPX’s magnetic timeline and I did too at first.  But once you get used to it you’ll understand why it’s so helpful.  If you’re working on a complicated project it will save you tons of time because it automatically shifts everything (without knocking stuff out of sync or overwriting something you want to keep) when you trim, add or cut clips.

Compound Clips:  I LOVE this feature.  If you get a section of your video edited just the way you want it, you can turn that segment into a compound clip.  Then you can move that segment anywhere you want or add effects to the entire sequence.  And if you decided you want to make some deeper changes, you just need to “break apart clip items” to un-compound the clip.  If you’ve never used FCPX before all this might sound a little confusing.  So here’s a great (and short) video that demonstrates both the magnetic timeline and compound clips:

AutoSave:  There is no “Save” command in Final Cut Pro X.  It took a while for me to fully accept that.  In fact I’ve been using the program for about 6 weeks and sometimes I still go to save after I finish a sequence.  But the program is constantly autosaving your work so you never, ever have to save.  This is a little frustrating since it even saves changes that you might not want to keep.

The Skimmer:  The skimmer is going to annoy the hell out of you at first.  It constantly previews any clips that you mouse over.  You can turn the skimmer off but you need to resist that temptation.  Just leave it on because you’ll like it once you get used to it.

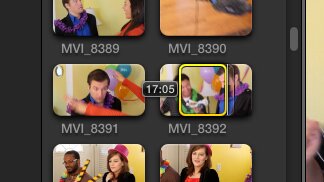
Range Selector:  At first I thought this feature was childish because apparently it comes from iMovie.  But if you give it a chance you’ll quickly see that it can be really helpful.  In FCPX you can skim through clips before you drop them on the timeline.  You can also set in (I) and out (O) points on the clip.  This feature is a little hard to describe so check out this screenshot.  The range selector lets you choose what part of the clip you want to add to the timeline.

The Yellow box let’s you set In and Out points on a clip

So that’s the stuff that takes some getting used to.  Here are some features that you’ll love as soon as you try them out.

Unlimited Undos:  This is the feature I’ve been waiting for my whole life.  Dont you hate it when you’re editing and you realize you screwed up like 20 clicks ago?  In the old FCP you could only undo like a dozen moves.  In FCPX you can undo your ass off!

The Position Tool:  You can’t turn off the Magnetic Timeline but you do have the option of using the Position Tool.  (Just hit P to switch.)  The Position Tool let’s you drop clips wherever you want and they won’t zoom over to connect with the closest clip.

Simple J and L cuts:  Need to extend the audio of one clip under the audio of another clip?  All you have to do is double click and the Audio and Video of a clip are separated.  They remain connected so you can’t knock them out of sync but now you can drag the audio beyond the start or end of a clip.  And thanks to the magnetic timeline, you can then tweak the clip you’re L or J cutting under without screwing up your J/L cuts.

Easy access to filters, transitions and titles:  You don’t have to dig through a bunch of folders to find the effects you want to use.  The titles, effects and filters are all together in a window in the bottom right hand corner of the screen.  This will save you like 6 seconds each time you need to make a transition but those seconds really add up if you’re working on a big project.  This is just one of the many ways that FCPX helps you edit much faster.

Lots of cool stock effects and filters:  The effects browser comes stocked with lots of nice stuff.  All the effects and filters are pretty basic but FCPX saves you the trouble of downloading and installing them.  The quality of these effects (the Simple Blur, Zoom and Ban and Lens Flare transitions are some of my favorites) are very professional and don’t look cheesy at all.

The Re-timing Tool:  You could slow down, speed up and reverse clips in FCP7 but FCPX’s re-timing tool has gone through some major improvements.  If you slow a clip down too much in FCP it looks kind of weird and jerky.  But re-timed clips in FCPX look super smooth.  If you have a one second long shot of a building you can slow it down and turn it into a 6 second establishing shot.  No one will know it’s a slowed-down shot unless they can see a mysterious slow bird floating across the frame.  The re-timing option is also easy to access and once again this will shave time off your edit.

You can edit while video is playing:  This is another huge time-saver.  Let’s say you drop a bunch of clips on the timeline so you can start working on a rough cut.  So you start playing your footage when you get to a spot where you want to make a cut.  You can just hit the Blade and the cut will appear but the video will keep playing.  You can even adjust keyframes or add effects or transitions without stopping playback.

Live previews of Un-rendered clips:  This might be my favorite feature of Final Cut Pro X.  If you adjust the color of a clip or add an effect or transition in Final Cut Pro, you have to wait for that clip to render before you can watch it.  But in FCPX you don’t have to wait for the render!  FCPX will let you watch a pre-rendered version of the clip.  The clip still needs to be rendered but the preview version is very, very close to what the final rendered version will look like.

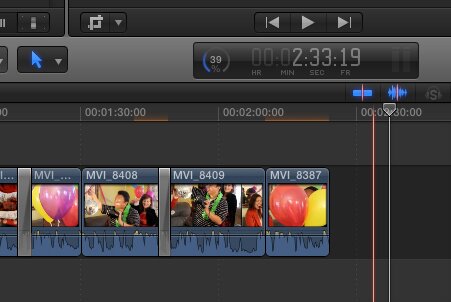
Background Auto-Rendering:  This is one of FCPX’s most famous features.  You no longer have to stop and let the program render your footage.  The rendering takes place while you work.  If you’re working on a huge project this will literally save you hours of down time.  Take a look at this screen shot:

-

The orange glow above the timelime means that those clips need to be rendered.  The Auto-rendering is always happening so as time goes by you’ll notice less and less orange.  And see that litle meter that says 39%?  That let’s you now how far along the rendering is.

No need to render DSLR footage:  If you’re like me, you shoot with a DSLR.  But if you want to edit DSLR footage in FCP you need to convert it or render it before you can watch it.  I was always in too much of a hurry to convert my clips so I would usually edit blind for a while and then stop for a render break.  But then every time I extended a clip by even a single frame I had to stop and render again.  None of that is necessary in Final Cut Pro X.  FCPX plays back DSLR clips without any hassle.

The price tag:  Final Cut Pro 7 used to cost like $1,200 so most non-pros could would have to head to the Pirate Bay if they wanted a copy.  But Final Cut Pro X is for sale in the apple store for just $299.99.  That’s not cheap but it’s also not prohibitively expensive.  When my 30 day free trial was up I could have gotten a quasi-legal copy from someone at work.  But I was so happy with the program that I bought my own legit copy.  Apple has really made a great piece of software and they deserve every penny of my $299.99.

Recent Software Updates:  Apple sort of blew the roll-out of Final Cut Pro X.  They released the software before it was 100% ready so a lot of pros were shocked when some important features were missing.  They saw this as an insult and dismissed FCPX as “iMove Pro.”  But Apple has delivered the updates they promised and now FCPX can pretty much do everything that Final Cut Pro 7 could do.  The big missing feature was the MultiCam option and it was added in one of the first updates.  It works great and comes in really handy if you need to edit together a live event or a music video.  So if someone tells you that Final Cut Pro X isn’t for professionals, tell them they need to check out the changes that have been made since 2011.

Final Thoughts:  All of the features I just listed are great but I love FCPX in general for two reasons; it’s faster than Final Cut Pro 7 and it’s easier than Final Cut Pro 7.  A project that would have taken me 8 hours to edit in FCP7 will only take me 5 hours in FCPX. I’ve also barely scratched the surface when it comes to the improvements Apple has made.  Importing is easier, transitions look smoother, there are lots of helpful exporting options, the multi-channel audio editing is hassle free, the “Ken Burns Effect” let’s you make quick digital zooms and pans, you can preview an effect before adding it to a clip, the new color wall (which replaces the color wheel) is pretty nice once you get used to it and finally if you install the right plugins you can edit RED camera of MXF clips without converting them first.

I understand that some of this stuff may sound confusing.  I was lucky in that I was paid to do a week of training in FCPX.  But really, I learned most of the basics by watching Final Cut Pro X tutorials on youtube.  If you haven’t tried FCPX yet (or since the updates were added) you really should give the program a shot.  Apple has made it clear that the old Final Cut Pro that you’re used to is dead.  There will never be a Final Cut Pro 8.  So eventually you’re going to have to learn how to use the new software.  The 30 day free trial version of FCPX works exactly like the regular version.  When your free month is over you just have to pay if you want to keep using it.  You won’t be billed automatically so you might as well head to and give it a shot.  Before I started writing this post I went back and tried Final Cut Pro 7 for the first time in about 6 weeks.  I felt like I was using something from the stone age.  Trust me, if you approach FCPX with an open mind and if you take the time to really learn the program you’ll never want to go back to FCP7.

-

OVC’s tips for being a video contest winner

Sorry the blog has been kind of quiet lately.  I started a new job as an editor this month and I’ve been working like crazy.  (I’ve only had time to watch 4 episodes of the new season of Arrested Development!)  I had to learn Final Cut Pro X really quickly and my brain no think good right now.  So VCN will be a little sparse and sloppy for a while.  But my schedule and my mind should be back to normal soon enough.  In the meantime, I’m just going to share some content that someone else put a lot of work in to.  Each week the folks at my favorite website, Onlinevideocontests.com post a video that lists new and notable video contests.  In a recent special episode they outlined several tips for filmmakers who want to start winning video contests.  Their advice is great and the video is well worth 2:14 of your time.

-

If you’d like to subscribe to OVC’s youtube channel, .

-

How to hang on to your lens cap

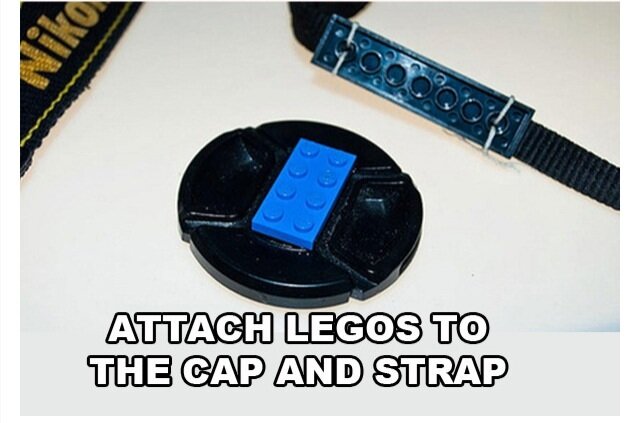
I’m a total goofus when I’m out shooting and I’m constantly fumbling around with my DSLR’s lens cap.  I almost always temporarily misplace it and I’ve had to buy at least 2 new caps in the last 4 years.  I saw this ingenious little life hack on Reddit yesterday and I think I’m going to have to try it…..

-

Of course I’ll probably will go with a black Lego since I don’t want to look like a complete dork.  Reddit users aren’t exactly great at citing their sources (i.e. people just steal stuff and pass it off as their own original content) but I checked google and it looks like the Lego tip originally came from

-


Designed by: Free Cell Phones | Thanks to Highest CD Rates, Domain Registration and Registry Software