This year Tongal has been running a ton of stop motion-themed video contests. But I’ve never entered any of them because I had absolutely no idea how to create a stop motion animation. So earlier this summer I decided to finally buckle down and figure out how to do it. Turns out the right gear and the right program make the whole processes hilariously simple. Here now is my first attempt at making a stop motion video since I was about 14. A friend of mine did a cute little song for a Dole contest and I wanted to add some quirky visuals. (Check out my previous post to see the great song/video she did for Butterfinger’s Last Spokesman on Earth Contest.) I think it turned out a lot better than my last stop motion project which was a 10 second video of a toy Rancor chasing a stormtrooper across my desk. Like I said, I was 14.
The animation wasn’t very smooth but I actually like that jumpy look; it kind of fit the mood of the song. But if I had taken more frames it could have been a lot smoother. I also screwed up and had my camera set to take 2 quick shots each time I took a a picture. Each frame was exposed differently and that’s why you can see kind of a flicker effect when the fruit cups are moving around in the freezer. So don’t do that unless you want your video to look like a silent film!
Now, let’s go over how you can make something as amazing and brilliant as my (non-winning) Dole video. I’m going to assume you know a thing or two about film and that you already understand how to SHOOT a stop motion scene. So here’s what you do after you take all your photos.
STEP 1: Once you’re done taking your photos, import them from your DSLR into your computer. Put them into their own folder and take a few minutes to look them over. If you notice any messed up images you’ll want to delete them. A sudden change in lighting or your big fat hand in the shot will ruin the optical illusion of your animation.
STEP 2: If you don’t already own QUICKTIME 7 PRO you’re going to need to buy it! It’s $29 and well worth the money. Head to buy it.
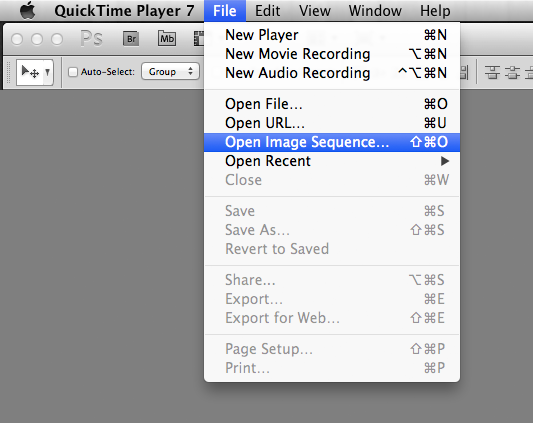
STEP 3: Open up your new copy of Quicktime 7 Pro and go to FILE and select OPEN IMAGE SEQUENCE:
STEP 4: Find your photos on your computer. Click on just the first photo in the sequence. Quicktime will automatically snag all the photos in the folder.
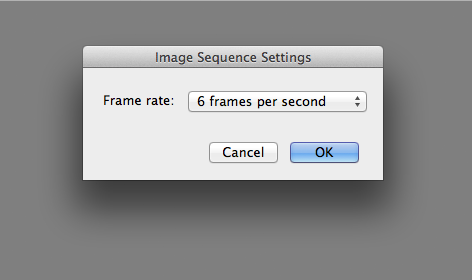
STEP 5: Chose how many Frames Per Second you want. Normal video might feature 24 frames per second but you’ll only be able to choose that option if you took a ton of shots. I’ve found that 12 frames per second works just fine.
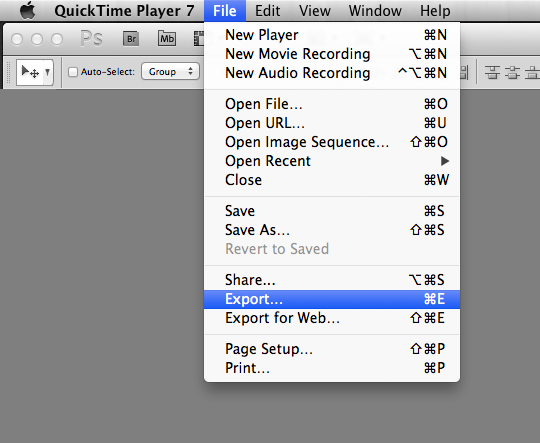
STEP 6: It’s magic time! Quicktime will string all your photos together into a video sequence. If you like the way it looks, go to FILE and select EXPORT to turn the sequence into an MOV file.
And that’s it! Now you can drop the file in your timeline and start editing. Of course, you might have to crop your new sequence some since the size of your photos won’t fill up a wide screen frame. So when you take your photos, leave yourself some room to crop the finished video.
Ok so you’ve seen my goofy attempt at stop motion, now I want to see yours. If you enter one of Tongal’s stop motion contests, send me a link to your video so I can see how awesome you are!
 .
.


 Posted in
  Tags:
Tags: 


